-
Read the WELCOME ALL BMWFANATICS post.
You are using an out of date browser. It may not display this or other websites correctly.
You should upgrade or use an alternative browser.
You should upgrade or use an alternative browser.
Gavsadler's 2011 E90 M3 Sedan M-DCT
- Thread starter gavsadler
- Start date
Awesome write up Gavs!
There really is something special about the 4th iteration of the M3 and I find it immensely rewarding to drive, whether it be tootling along while warming up or giving it horns on the freeway.. I have to say that it gets a lot of heads turning for a car designed some 15 years ago, I often get people pull up just to give me a thumbs up or nod before they go on their way.
That said, I know exactly what you mean in your closing statement.. My E46 holds a special place in my heart and the car does something for me, I always fail to accurately express in words.. Every drive in that car makes me smile and reminds me why I love it to bits. It is nowhere near as accomplished as the E92, but I would sooner sell my M3 than my 30i - ponder that...
Kyle
///Member
[font=Tahoma, Verdana, Arial, sans-serif]But the fact of the matter is that I am gravitating more towards the older model cars, than the newer ones. I’m also not dismissing the accomplishments of the modern cars. They are fast, safe, refined, comfortable, fuel efficient and full of tech and gadgets to make daily duties a breeze. But ticking all these boxes means that they have also become more clinical, more generic, more acceptable by the masses and satisfy the accountants by ticking more boxes in a single product.[/font]
Couldn't agree more, you simply do not feel in control of modern performance cars... I really miss the analogue feel everything in the E90 M3.
gavsadler
///Member
Update Nov-20:
So in recent weeks, this car has assumed the role of the mommy-mobile, completing short trips on a daily basis. This hasn't helped fuel consumption at all. I think the last tank was 15.8l per 100kms, and the current tank is somewhere the wrong side of 17l per 100kms. Thankfully this isn't too noticeable due to the fact that mileage is so little, so it's still just a monthly trip to the petrol station.
Also, a few weeks back I noticed some oil on the garage floor. Initially I thought this may have been my Ute, but after moving the M3 to a different parking spot, the oil spot moved with it.
One day I put it up on the ramps (also a bit of a story), and inspection underneath confirmed it - I have some horsepower sweat from the S65.
View attachment 8
View attachment 9
After some more inspection and chats with Peter, it seems like the leak is coming from the oil filter housing gasket. So this is something I'll have to attend to at the next oil change next month. Need to sort out the other cars first before I pull this one to pieces.
Oh, and there is another issue which seems to be creeping up: on some cold starts, about 30secs in, the car starts to idle roughly, almost like it has hot cams fitted. This does seem to go away after about 2mins, but will need to keep an eye on this. On one occasion, it did go into limp mode, and scans showed that it could be related to fueling. Further updates to follow.
Also due with the oil change next month is a brake fluid flush, and possibly chatting with Danny about the DCT flash. But let's see..
That's all for now.
Attachments

gavsadler
///Member
I clean forgot about this update. I’m going to combine this update for across the 4 cars in the fleet.
In July, following a refund from SARS, I decided to treat myself to a device to satisfy my nerdy tendencies. So after some chats with Firi, a day later my Dragy arrived.
First impressions: it’s really small, maybe the size of 2 BIC lighters held together. I gave it a charge, and after downloading the app to my phone, I was ready to test it out. I decided to keep things simple and stick it on top of the dash with 2 blobs of Prestik. This worked just fine, and for the first couple of days, I experimented with the settings and how it all works. It is very simple to use.
Thereafter, I decided on a private test track to use for some runs. It’s straight and long enough to get a 1/4mile in and have sufficient stopping distance too. Unfortunately it’s not 100% flat, but over the 400m, the gradient changes cancel each other out, which the app then regards as a valid run.
For the runs that you see below, I also didn’t apply too much rocket science. The intention was to mash the throttle / do a brisk pull off, as you would in a normal, day-to-day scenario. No activating of launch control, no warming up tyres, traction control activated (where applicable) etc. So yes, there is probably room for improvement on some of the cars (or they could fare worse) – who knows. This is purely for comparison, same road, similar conditions, same driving style.
I’ve added an image below, of the runs from each car, and the data generated. 1st place goes to the M3, 2nd the X3, 3rd for the Ute and 4th the 130i. Some data which peaked my nerdy interest:
View attachment 7
M3:
[video=youtube]
X3:
[video=youtube]
Corsa Ute:
[video=youtube]
As mentioned earlier, there are probably more ideal conditions, a better private test track, and better driver skills to be realised, which will result in lower times, but that was not the point of this exercise. It was to do some real-world “one take” runs of each vehicle.
All-in-all, a great little product, accuracy seems good and like I’ve said, I geek out on analysing the numbers and the graphs. I look forward to using it more in future and maybe trying for quicker runs in better conditions and on a better private test track.
Thanks for reading.
[video=youtube]
In July, following a refund from SARS, I decided to treat myself to a device to satisfy my nerdy tendencies. So after some chats with Firi, a day later my Dragy arrived.
First impressions: it’s really small, maybe the size of 2 BIC lighters held together. I gave it a charge, and after downloading the app to my phone, I was ready to test it out. I decided to keep things simple and stick it on top of the dash with 2 blobs of Prestik. This worked just fine, and for the first couple of days, I experimented with the settings and how it all works. It is very simple to use.
Thereafter, I decided on a private test track to use for some runs. It’s straight and long enough to get a 1/4mile in and have sufficient stopping distance too. Unfortunately it’s not 100% flat, but over the 400m, the gradient changes cancel each other out, which the app then regards as a valid run.
For the runs that you see below, I also didn’t apply too much rocket science. The intention was to mash the throttle / do a brisk pull off, as you would in a normal, day-to-day scenario. No activating of launch control, no warming up tyres, traction control activated (where applicable) etc. So yes, there is probably room for improvement on some of the cars (or they could fare worse) – who knows. This is purely for comparison, same road, similar conditions, same driving style.
I’ve added an image below, of the runs from each car, and the data generated. 1st place goes to the M3, 2nd the X3, 3rd for the Ute and 4th the 130i. Some data which peaked my nerdy interest:
View attachment 7
- Note the gear shift delays (orange line) on the 2 manual cars vs the 2 auto cars. Again I was shifting normally, no race-style shifting or flat shifting or looking for the elusive money shift. I have mechanical sympathy.
- Looking at the acceleration curve (blue line), the M3 and Ute have quite steep gradients most of the run, whereas the X3 has a strong showing initially, but then a much lazier curve (don’t get me wrong, the car is still rapid). The 130i is also not as strong as the turbo cars up at the reef.
- Interestingly, the 60ft time of the 130i is the best of the lot, I attribute this to less torque and less interference from the DSC. Next up is the X3 which also hopped off the line nicely – due to the x-drive. Thereafter is the M3, and lighting up the tyres at the back of the pack is the Ute.
- The terminal speed of the Ute over 400m is higher than the X3 – probably due to aerodynamics and also being able to put down more power once the front wheels have grip in the higher gears. Lighter weight may also help matters somewhat.
M3:
[video=youtube]
X3:
[video=youtube]
Corsa Ute:
[video=youtube]
As mentioned earlier, there are probably more ideal conditions, a better private test track, and better driver skills to be realised, which will result in lower times, but that was not the point of this exercise. It was to do some real-world “one take” runs of each vehicle.
All-in-all, a great little product, accuracy seems good and like I’ve said, I geek out on analysing the numbers and the graphs. I look forward to using it more in future and maybe trying for quicker runs in better conditions and on a better private test track.
Thanks for reading.
[video=youtube]
Attachments

BeemerFanatic
Events Organiser
Nice vids. That V8 tone with intake and exhaust is Amazing!
gavsadler
///Member
Benji said:Nice vids and very interesting post! Now the penny has finally dropped to who the "i know a guy" that you talk to when you are alone is
Shhhhhh man. You're upsetting my alter ego
Benji
Well-known member
gavsadler said:Benji said:Nice vids and very interesting post! Now the penny has finally dropped to who the "i know a guy" that you talk to when you are alone is
Shhhhhh man. You're upsetting my alter ego
:roflol:
gavsadler
///Member
Update: Jan-21:
In line with my other updates, with the X3 being out of action for the last few months of 2020, the M3 assumed the role of daily driver / mommy-mobile. It would prove to be an interesting time, to see how well it would fare, compared to the effortless nature of the X3 in this department.
In summary, on the positive side, my wife enjoyed that everything just works in the M3, as well as the additional creature comforts: the electric seats with the press of a button, the seating position adjusts from 1.9m Giraffe driver mode, to 1.67m wife mode, lol. The integrated bluetooth connects seamlessly each and every time, and also allows for music streaming from the phone, so no need for aux cables and so on (the Fiscon is still proving to be problematic in the X3, but that is work in progress). Overall, comfort was acceptable, as well as the solid feeling on the road. The lower ride height wasn't too much of a concern either.
The negatives as a daily driver: the mild drone from the exhaust at low speeds. My wife has some inner ear issues, and the Akra didn't help matters, if anything, it annoyed her and made her feel worse on occasion. For me, being a car as opposed to a SUV, it was a bit of a pain in the ass to bend down and reach in the back to check that the kids are buckled up properly (this is where a higher car is really awesome). And to end off - fuel consumption, especially on the short trips we do, was horrendous. I think the standard was around 18l per 100kms. So even though we do hardly any mileage, it still needs a fill up once a month.
With that being said, some kms were clocked up, and in December, it was time to service and address that niggly oil leak I discovered a few months before. With the X3 now operational again, the M could be parked in the garage and attended to.
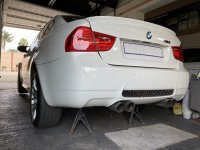
So, up onto jack stands it went, I'm still impressed with the torsional rigidity of this car, jacking up one corner lifts the entire side of the car just about.
View attachment 9
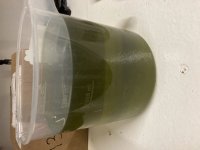
First job at hand was to remove the wheels so that I could bleed the brakes. I decided to fill with BMW Dot4 brake fluid, as I'm probably not going to be visiting race tracks anytime soon. The first pic shows what I sucked out the brake fluid reservoir, and compared to some of the new fluid going in. The second pic shows all the fluid that I bled out of the car:
View attachment 3
View attachment 4
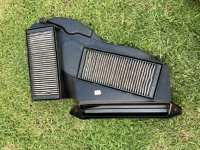
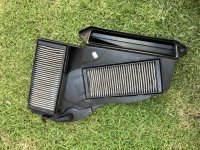
I also removed the cabin air filters and dusted them out, and cleared dust out the filters. There was not much as they had only been in for about 6000kms:
View attachment 1
View attachment 2
Once all that was done, the wheels went back onto the car. Next up: addressing the oil leak. Diagnosis and consultation with others pointed to a leaking oil filter housing gasket. In my next post, I'll outline the process I followed, as well as some pics.
In line with my other updates, with the X3 being out of action for the last few months of 2020, the M3 assumed the role of daily driver / mommy-mobile. It would prove to be an interesting time, to see how well it would fare, compared to the effortless nature of the X3 in this department.
In summary, on the positive side, my wife enjoyed that everything just works in the M3, as well as the additional creature comforts: the electric seats with the press of a button, the seating position adjusts from 1.9m Giraffe driver mode, to 1.67m wife mode, lol. The integrated bluetooth connects seamlessly each and every time, and also allows for music streaming from the phone, so no need for aux cables and so on (the Fiscon is still proving to be problematic in the X3, but that is work in progress). Overall, comfort was acceptable, as well as the solid feeling on the road. The lower ride height wasn't too much of a concern either.
The negatives as a daily driver: the mild drone from the exhaust at low speeds. My wife has some inner ear issues, and the Akra didn't help matters, if anything, it annoyed her and made her feel worse on occasion. For me, being a car as opposed to a SUV, it was a bit of a pain in the ass to bend down and reach in the back to check that the kids are buckled up properly (this is where a higher car is really awesome). And to end off - fuel consumption, especially on the short trips we do, was horrendous. I think the standard was around 18l per 100kms. So even though we do hardly any mileage, it still needs a fill up once a month.
With that being said, some kms were clocked up, and in December, it was time to service and address that niggly oil leak I discovered a few months before. With the X3 now operational again, the M could be parked in the garage and attended to.
So, up onto jack stands it went, I'm still impressed with the torsional rigidity of this car, jacking up one corner lifts the entire side of the car just about.
View attachment 9
First job at hand was to remove the wheels so that I could bleed the brakes. I decided to fill with BMW Dot4 brake fluid, as I'm probably not going to be visiting race tracks anytime soon. The first pic shows what I sucked out the brake fluid reservoir, and compared to some of the new fluid going in. The second pic shows all the fluid that I bled out of the car:
View attachment 3
View attachment 4
I also removed the cabin air filters and dusted them out, and cleared dust out the filters. There was not much as they had only been in for about 6000kms:
View attachment 1
View attachment 2
Once all that was done, the wheels went back onto the car. Next up: addressing the oil leak. Diagnosis and consultation with others pointed to a leaking oil filter housing gasket. In my next post, I'll outline the process I followed, as well as some pics.
Attachments


gavsadler
///Member
How to replace the oil filter housing gasket on E9x M3 (S65):
Right, so earlier on in the year, I noticed some spotting on the garage floor. I thought this may have been from my Ute, but subsequently, it turned out to actually be the M3. A few months back, I pulled off the aluminium undertray, and it was full of oil. As mentioned earlier, diagnosis pointed to the oil filter housing gasket.
Credit must go to Peter for his advice, and also a wealth of information on the US Bimmerpost forum, and specifically this thread: https://www.m3post.com/forums/showthread.php?t=1312849
Time taken: 11hrs. This includes prep time, looking, checking and learning. I worked slowly and carefully so as not to break anything. Also, this time included all cleanup activities and packing away tools etc. Having done the job now, this time estimate could be reduced quite substantially.
I didn't take too many pics, given the messy nature of the job, but will add where relevant. Here's my account of the job at hand:
This was after removing the airbox, intake elbow and snorkel, lots of stripping still lays ahead...
View attachment 7
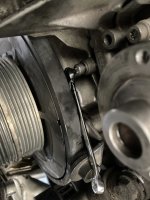
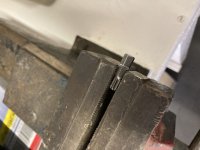
Note: 1 bolt holding the oil filter housing to the block sits behind the main crankshaft pulley. There are lots of posts about how guys make up their own special tool, to get in there, which eliminates having to remove the crank pulley. I cut a small T30 torx bit in half, and machined a 6mm spanner to 6.4mm, and taped it up. (I had to try twice, as even with tape I managed to lose the bit into the depths of the engine bay).
View attachment 8
View attachment 9
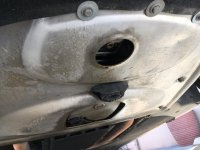
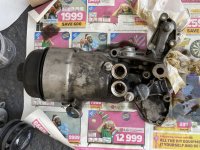
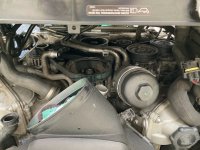
Pulling the oil filter housing off, reveals an oily mess, and the old gasket sticks to the block. It did feel a bit hard and brittle. There is clear evidence that oil was leaking beneath it:
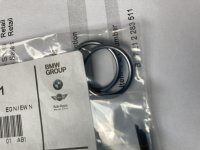
The replacement o-rings for the oil cooler pipes. Note: these are a special silicone o-ring, resistant to oil, and also seem to be a special size. I compared to a number of kits with "normal" o-rings out of interest, and none matched the size correctly. R70 for the pair:
View attachment 1
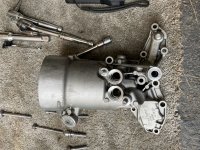
The oil filter housing - it looks like it may have been leaking from the lines as well. Very dirty and gunky just below where the lines attach:
View attachment 2
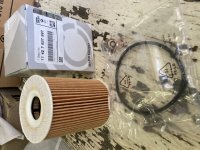
New oil filter kit, with washers and o-rings:
View attachment 3
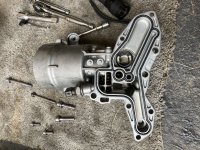
The cleaned oil filter housing, with new gasket installed:
View attachment 4
View attachment 5
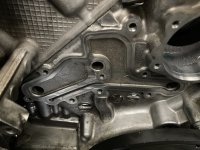
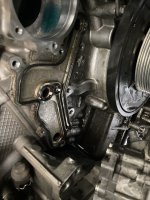
The cleaned up area on the motor, ready for reassembly:
View attachment 6
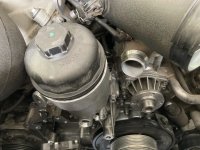
Oil filter housing installed:
View attachment 7
Halfway through closing up and reassembly:
View attachment 8
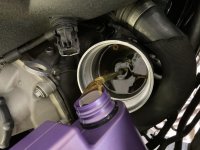
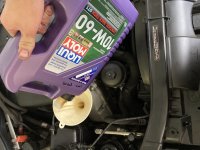
And 8.8l of the good stuff going back in (and hopefully staying in):
View attachment 9
So far, I've only driven the car about 4kms, and my Mrs has done 3kms. It's still running, no warning lights, no low fluids, no bad leaks. So I am mildly optimistic that this will be a success :smilebounce:
Right, so earlier on in the year, I noticed some spotting on the garage floor. I thought this may have been from my Ute, but subsequently, it turned out to actually be the M3. A few months back, I pulled off the aluminium undertray, and it was full of oil. As mentioned earlier, diagnosis pointed to the oil filter housing gasket.
Credit must go to Peter for his advice, and also a wealth of information on the US Bimmerpost forum, and specifically this thread: https://www.m3post.com/forums/showthread.php?t=1312849
Time taken: 11hrs. This includes prep time, looking, checking and learning. I worked slowly and carefully so as not to break anything. Also, this time included all cleanup activities and packing away tools etc. Having done the job now, this time estimate could be reduced quite substantially.
I didn't take too many pics, given the messy nature of the job, but will add where relevant. Here's my account of the job at hand:
- I let the car run for about 5-10mins to warm up and circulate the oil, to make it easier to drain.
- I had the car on jack stands to a decent height, enough to get a bucket underneath to drain the oil (as part of the service), and also to catch as much coolant as possible, instead of it messing on the floor everywhere.
- Remove underbody plastic protective tray, as well as the felt front sections just below the radiator and cooling fan. This will allow access to the oil cooler hoses, so that they can be unclipped from the cooling fan shroud.
- Remove front and rear sump plugs to drain the oil. From what I read, it's recommended that the car drain oil for at least 1 hour before refitting the sump plugs (with new copper washers - part of the oil filter kit).
- Crack the lid of the oil filter housing to break the air lock, this will also help to drain more oil, and slightly faster. Top tip: wrap a cloth around the housing to catch any oil which drips off the lid, or when you remove the old filter.
- Leave the car to stand and cool down, in the coming steps, coolant hoses will be loosened, so you don't want to get burnt on that, or touching the radiator / engine.
- Remove airbox, intake elbow and the snorkel that feeds the airbox.
- Remove radiator fan, remember to unplug the wiring harness at the top left corner (standing in front of the car, looking at the engine), and unclip the oil cooler lines from the bottom (easier than fiddling from the top).
- Loosen the main waterhose which fits to the top right of the radiator (looking from the front of the car).
- Loosen the breather hose which goes to the coolant reservoir.
- Loosen the main waterhose in front of the oil filter housing - where it fits onto the thermostat housing.
- Remove waterpump pulley.
- Remove waterpump (I tried, but don't think it's possible to remove the housing with the waterpump in place. Otherwise I still have tricks to learn).
- Loosen oil cooler lines off of oil filter housing. Keep these up, to prevent excess oil drainng and messing everywhere.
- Remove both belts - take note of the orientation of the belts on the pulleys (Take photos / draw a schematic diagram).
- Remove belt tensioner on LHS.
- Remove idler pulley on LHS.
- Loosen power steering pump, and brackets holding hoses at the bottom. This allows it to move away from the motor, allowing access to a few bolts of the oil filter housing.
- Remove oil filter housing, it is held on with 9 torx bolts (6x T30 and I think 3x T40).
- Clean area on block.
- Clean oil filter housing.
- Clean oil cooler lines, fit new o-rings (special oil-resistant ones).
- Fit new gasket into oil filter housing.
- Reinstall.
- Reverse the rest of the steps above.
- Don't forget to fill up with oil and coolant / water.
- Say a prayer.
- Start the car.
- Confirm nothing blows up, no funny noises, etc.
This was after removing the airbox, intake elbow and snorkel, lots of stripping still lays ahead...
View attachment 7
Note: 1 bolt holding the oil filter housing to the block sits behind the main crankshaft pulley. There are lots of posts about how guys make up their own special tool, to get in there, which eliminates having to remove the crank pulley. I cut a small T30 torx bit in half, and machined a 6mm spanner to 6.4mm, and taped it up. (I had to try twice, as even with tape I managed to lose the bit into the depths of the engine bay).
View attachment 8
View attachment 9
Pulling the oil filter housing off, reveals an oily mess, and the old gasket sticks to the block. It did feel a bit hard and brittle. There is clear evidence that oil was leaking beneath it:
The replacement o-rings for the oil cooler pipes. Note: these are a special silicone o-ring, resistant to oil, and also seem to be a special size. I compared to a number of kits with "normal" o-rings out of interest, and none matched the size correctly. R70 for the pair:
View attachment 1
The oil filter housing - it looks like it may have been leaking from the lines as well. Very dirty and gunky just below where the lines attach:
View attachment 2
New oil filter kit, with washers and o-rings:
View attachment 3
The cleaned oil filter housing, with new gasket installed:
View attachment 4
View attachment 5
The cleaned up area on the motor, ready for reassembly:
View attachment 6
Oil filter housing installed:
View attachment 7
Halfway through closing up and reassembly:
View attachment 8
And 8.8l of the good stuff going back in (and hopefully staying in):
View attachment 9
So far, I've only driven the car about 4kms, and my Mrs has done 3kms. It's still running, no warning lights, no low fluids, no bad leaks. So I am mildly optimistic that this will be a success :smilebounce:
Attachments
-
 IMG_0130 (Large).jpg608.9 KB · Views: 147
 -
 IMG_0131 (Large).jpg374.2 KB · Views: 149
 -
 IMG_0133 (Large).jpg363.6 KB · Views: 148
 -
 IMG_0134 (Large).jpg373.4 KB · Views: 148
 -
 IMG_0137 (Large).jpg286.3 KB · Views: 149
 -
 IMG_0141 (Large).jpg357.3 KB · Views: 149
 -
 IMG_0129 (Large).jpg627.5 KB · Views: 148
 -
 IMG_0125 (Large).jpg357.4 KB · Views: 147
 -
 IMG_0124 (Large).jpg470.8 KB · Views: 146
 -
 IMG_0123 (Large).jpg231.6 KB · Views: 148
 -
 IMG_0118 (Large).jpg352.7 KB · Views: 145
 -
 IMG_0117 (Large).jpg284.1 KB · Views: 146
 -
 IMG_0116 (Large).jpg236 KB · Views: 146
 -
 IMG_0110 (Large).jpg367.6 KB · Views: 148
922-ZN
Well-known member
Veedub said:Awesome work. Any idea what BMW would charge for this job? Also, any reason for using 10W60 as opposed to 5W60 oil? Given that the bearing issue warrants a thinner oil when cold.
Thinner oil makes the car run hotter and temps climb quickly when driving hard.
Well done Gav, you're a brave man
922-ZN said:Veedub said:Awesome work. Any idea what BMW would charge for this job? Also, any reason for using 10W60 as opposed to 5W60 oil? Given that the bearing issue warrants a thinner oil when cold.
Thinner oil makes the car run hotter and temps climb quickly when driving hard.
Well done Gav, you're a brave man
Hasn't this been compensated for by going 60, as opposed to 40 on the 'hot' range?
gavsadler
///Member
Veedub said:Awesome work. Any idea what BMW would charge for this job? Also, any reason for using 10W60 as opposed to 5W60 oil? Given that the bearing issue warrants a thinner oil when cold.
Apparently the job card is just over 3hrs for this job, assuming they know exactly what to do and have all tools at hand etc. 10W60 is the recommended oil for the S65 motor, so I'm sticking to that. The tolerances are very tight on this motor, and I have no intention of fiddling and ruining the motor (a new motor installed at BMW is the other side of R270k).
I must say, after refitting all the belts, I turned the motor by hand to make sure all was well, and damn this thing is tight. 8 cylinders and 12:1 compression ratio does no favours for the forearms haha
gavsadler
///Member
Update: Mar-21:
In line with my other threads, I've been using a couple of new and different Detailing and Auto Care products on the various cars. One of them which I was curious about is the Meguiar's Hybrid Ceramic Wax. I'm pretty happy with there usual Wax products, so was keen to see if the "Ceramic" content makes any difference. (Detailed reviews will be published in seperate threads.
Here's the results after the initial main coat 2 weeks prior, and then the top up coat after a subsequent wash:
.jpg")
.jpg")
.jpg")
.jpg")
.jpg")
Moving along, in one of my early reviews of the car, I likened it to J Lo, sexy with some hips going. I'd like to extend this analogy a little further, in that this car requires as much fuss to keep happy, as the fuss it creates when out and about, lol.
I previously reported about an intermittent miss on cold starts, which went away after about 2mins of idling. Scanning the car pointed to a possible faulty temperature sensor which sits on top of the water pump housing. One day some time was available, so I removed the airbox and intake plenum to get to the said sensor. To my surprise, I found that the harness clip was not securely attached to the sensor. I sprayed some electrical cleaner on both ends, and after securing the plug, started the car and it was sorted. The cold start sequence now is also completely different than before (previously it would start and rev up to 2000rpm, before settling into an idle around 800rpm). Now, the cold start briefly revs to 2000rpm on initial start, then idles at about 1200rpm for about a minute, before slowly decreasing the idle speed as the motor warms up.
While everything was off, I took a pic of the lovely throttle bodies, and took a quick vid of them in action (light load). The car really barks without the filter and intake parts to suppress the noise. (Excuse the cameraman - amateur who also got a bit of a fright at the end of the video, lol):
.jpg")
I'm glad to get this sorted and that it was a simple fix (although irritated as either myself or my brother-in-law didn't secure this properly the last time the plenum was off. Anyway, moving on....
Fast forward a few weeks, and I was making good use of the new microfiber products: the Chenille Wash Mitt and Gauntlet drying towel from The Rag Company. Both awesome products and will post separate, more detailed reviews soon:

.jpg")
So, with the car running well, and nice and clean, what could possibly happen next? Well, in keeping with the celeb maintenance requirements, the next error popped up.
I thought the same issue had re-occured, in that on cold start, the car was idling all rough and would go into limp mode, this happened consistently for about 5 days in a row. Scanning the car, the issue was not an old problem, but rather a new fault: the O2 sensor on bank 1 was not happy.
So... car up on trestles again, and stripping off some of the underbody panels to get easy access. I struggled to remove the sensor, but once out, it was apparent why. The sensor basically has 1 complete thread remaining, and half the other threads are sheared off smooth. I can only think that this must have happened then the Akra exhaust was installed by the previous owner (at a BMW dealership somewhere in KZN I believe). I wish I had taken pics of this, but I didn't.
I decided to swap the sensors across, and then see if the fault moves from one bank to the other. Well that was 1 month ago, and since then, no faults. The car has started and driven without any issues on at least half a dozen occasions. So again, maybe just the wiring connections were a bit dry or needing some re-fitting / adjustment for proper contact.
For reference: the sensors are also made by Bosch, the front sensor (pre-cat) part number is 17039 and the rear sensor (post-cat) is 16793.
Also in the past couple of weeks, I also decided to give the car a pre-wash with my Karcher and foam cannon:
.jpg")
.jpg")
In line with my other threads, I've been using a couple of new and different Detailing and Auto Care products on the various cars. One of them which I was curious about is the Meguiar's Hybrid Ceramic Wax. I'm pretty happy with there usual Wax products, so was keen to see if the "Ceramic" content makes any difference. (Detailed reviews will be published in seperate threads.
Here's the results after the initial main coat 2 weeks prior, and then the top up coat after a subsequent wash:
Moving along, in one of my early reviews of the car, I likened it to J Lo, sexy with some hips going. I'd like to extend this analogy a little further, in that this car requires as much fuss to keep happy, as the fuss it creates when out and about, lol.
I previously reported about an intermittent miss on cold starts, which went away after about 2mins of idling. Scanning the car pointed to a possible faulty temperature sensor which sits on top of the water pump housing. One day some time was available, so I removed the airbox and intake plenum to get to the said sensor. To my surprise, I found that the harness clip was not securely attached to the sensor. I sprayed some electrical cleaner on both ends, and after securing the plug, started the car and it was sorted. The cold start sequence now is also completely different than before (previously it would start and rev up to 2000rpm, before settling into an idle around 800rpm). Now, the cold start briefly revs to 2000rpm on initial start, then idles at about 1200rpm for about a minute, before slowly decreasing the idle speed as the motor warms up.
While everything was off, I took a pic of the lovely throttle bodies, and took a quick vid of them in action (light load). The car really barks without the filter and intake parts to suppress the noise. (Excuse the cameraman - amateur who also got a bit of a fright at the end of the video, lol):
I'm glad to get this sorted and that it was a simple fix (although irritated as either myself or my brother-in-law didn't secure this properly the last time the plenum was off. Anyway, moving on....
Fast forward a few weeks, and I was making good use of the new microfiber products: the Chenille Wash Mitt and Gauntlet drying towel from The Rag Company. Both awesome products and will post separate, more detailed reviews soon:
So, with the car running well, and nice and clean, what could possibly happen next? Well, in keeping with the celeb maintenance requirements, the next error popped up.
I thought the same issue had re-occured, in that on cold start, the car was idling all rough and would go into limp mode, this happened consistently for about 5 days in a row. Scanning the car, the issue was not an old problem, but rather a new fault: the O2 sensor on bank 1 was not happy.
So... car up on trestles again, and stripping off some of the underbody panels to get easy access. I struggled to remove the sensor, but once out, it was apparent why. The sensor basically has 1 complete thread remaining, and half the other threads are sheared off smooth. I can only think that this must have happened then the Akra exhaust was installed by the previous owner (at a BMW dealership somewhere in KZN I believe). I wish I had taken pics of this, but I didn't.
I decided to swap the sensors across, and then see if the fault moves from one bank to the other. Well that was 1 month ago, and since then, no faults. The car has started and driven without any issues on at least half a dozen occasions. So again, maybe just the wiring connections were a bit dry or needing some re-fitting / adjustment for proper contact.
For reference: the sensors are also made by Bosch, the front sensor (pre-cat) part number is 17039 and the rear sensor (post-cat) is 16793.
Also in the past couple of weeks, I also decided to give the car a pre-wash with my Karcher and foam cannon:
.jpg")
Similar threads
- Replies
- 46
- Views
- 3K
- Replies
- 25
- Views
- 2K