Corsa C Ute - Another Toy Story

Missioner

Member
Bloody plastic valve covers on those motors are a headache.

They leak worse if the motor overheats.

At that point the only fix is a new one.

Your thread is inspiring. I dont have nearly half the motivation you do to fix my car. I'm hoping that reading here will rub off a little and I will get my A into G.


gavsadler

///Member
So, after frantic activity a week before Raceday 2019, I got the Ute finished on Wednesday afternoon. That left me with Thursday and Friday to make sure everything was in order before the big day on Saturday.

I'm pleased to report that everything was in order, and the clutch felt great, typical of a new setup, it was very soft and easy to modulate. All the oil leaks were also sorted out too, so everything was looking promising. I didn't manage to get much driving done, but all-in-all, I completed 38kms before the trip to RedStar Raceway on Saturday morning.

There are threads elsewhere on the forum with more details and pics of the days events, so I am not going to go into too much detail around that. I'll just summarise a little bit from my experience.

After attending last year's event in the 130i, I was keen to participate again this year, and thought I'd mix things up a bit by entering with the Ute. I had been speculating a bit in terms of how it would compare. Obviously turbo power would help, but with skinnier tyres, and it's history making it essentially a commercial vehicle, things would be interesting. The fact that I was enrolled in the experienced class meant that there would be lots of flashy machinery around didn't do much for my nerves (thanks Firi, lol). Nevertheless, the game plan was to let the fast cars go out first in each session, and I would go out towards the back.

Also just a note: I went to the track in full street trim, nothing was removed from the Ute, and no fancy tyres etc. I just filled up with petrol, made sure the meth bottle was full and checked tyre pressures. For each of the sessions, my brother-in-law rode shotgun as well.

The first session wasn't too bad, getting to grips with how the Ute behaved on the track. On lap 2 though I botched my entry into one of the slower corners, and being on the dusty outside of the track only meant one thing: learning how to deal with oversteer :smilebounce:

[video=youtube]


Session 1 concluded without any further incidents. And after checking a few things, in a relatively short period of time, we were being called for Session #2. This also went smoothly. Gaining in confidence, I was pushing a little bit harder this time round.

Then in Session #3, I decided to push harder still. That being said, I was still driving well within my limits and with a fair deal of mechanical sympathy. But we were having fun.

Then, I had a bigger whoopsie, also going way too fast into a tight corner and off the racing line:

[video=youtube]

After this, I chilled for the rest of that lap, and thereafter I decided to push again and try and do a nice clean lap.

Again, I'm not The Stig, but it gives you a bit of an idea about what it's like to go around the track:

[video=youtube]


After this lap, my Ute decided enough was enough, and a misfire developed. After crawling back into the pits, diagnosis pointed to a dead coilpack. So that was the end of my fun for the day. My brother-in-law was there with his car, so he towed me home.

I really enjoyed the day out, despite it ending early for me. The Ute is a lot of fun on the track, and is actually quite lively in the corners, the front wants to dance around if you get too aggressive with the throttle inputs and torque steer kicks in, and the back is also very willing to kick out when provoked, but all in a very controllable way.

Thanks also to Chou in the Suzuki Swift Sport for playing along. We had good fun chasing and being chased. The Swift would gap me in the corners (semi slicks I think?) but on the straights I had a power advantage.


At the end of the day, checking the results I ended up with a 2:31.4, and this was some 6 seconds faster than I managed in the 130i last year (granted the tyres were old lol).
 

gavsadler

///Member
Just a quick update going back a couple of months (I'm getting bad at updates, haha).

Shortly after the track day, I noticed that my oil leak was back again. Having replaced everything at the bottom end, that only left an issue up top somewhere. Further diagnosis revealed that it was leaking at the back side of the tappet cover, just above the oil cooler.

So... off with the cover and time to replace the gasket. Here's a quick pic after cleaning it up and fitting the new gasket:

img_2156_8630200385.jpg


And a pic of the valvetrain before closing up:

img_2158_9504757204.jpg


I'm pleased to report: no more leaks :tiptoe: :joy:


And then, about a week later......

The battery decided enough was enough after about 5.5 years of use. I must say this Energizer battery has been good. I would have happily replaced it with another one.

I've been a regular at Battery Cabin in Edenvale, and I ended up going with a Varta this time round. Slightly more amperage and CCAs.

img_e2339_1404177100.jpg


Installed:

img_2341_2705469132.jpg


While I had the cowl panel stripped off, I see by cabin air filter is looking terrible, so will need to be replaced.

Fast track to Nov-2019, and things have been going well for the Ute, no leaks or further issues, together with some regular hauls of "stuff".

Going into December, I will probably replace brake pads at the rear, and possibly at the front as well, as they are starting to get near the indicators.

More updates in due course...
 

Benji

Well-known member
Wow I just read thru this from start to finish, thanks for an entertaining 2 hours! :) Ive just bought a similar utility 1.8 sport, Ive had the car 2 months now and still cant believe how slow it is...

Also looking at importing a few goodies from the UK for the Ute, do you have any tips or contacts who can assist me?
 

gavsadler

///Member
Back tacking a little bit…

Update Dec-2019:

The Ute has continued to fulfill it’s purpose of loading and transporting bulky stuff every other weekend. One day my brother-in-law called me to say that the tailgate does not want to open. I suspected it’s probably the tailgate handle which has given up.

Removing the old handle:

img_7046 (large)_2776925893.jpg


Closer inspection revealed that the bracket which holds one side of the hinge had broken off. So when pulling on the handle, it wasn’t activating the mechanism to release the catch.

Removing the lock mechanism:

img_7045 (large)_426819403.jpg


Old vs new handle:

img_7044 (large)_4613608616.jpg


I then reinstalled the locking mechanism onto the new handle. While everything was stripped, I also cleaned the rods and locking pins which secure the tailgate on each side. Once everything was installed again, I’m pleased to report that the handle is working better than ever before.

Earlier when I replaced the battery, I noted that the cabin air filter was looking very dirty. I purchased a replacement at the same time as the tailgate handle, so installed this as well. The old filter was installed for 4yrs / 40000kms.

img_7146 (large)_6780429935.jpg


Update Jan-2020:

Over December, the brakes were beginning to squeal more regularly. I know from the Fanatics Track Day in July that they were wearing down, so I already had the pads ready to change when the squeals became more apparent. My brother-in-law did the job, but didn’t take many pics.

I’ve replaced front and rear pads with EBC Yellow Stuff, as I’ve been happy with them over the past few years.

Front pads (approx. 52000kms covered):

img_7739 (large)_5310253754.jpg


Rear pads (approx. 90000kms covered, I don't recall changing these previously):

img_7738 (large)_6083329215.jpg
 

gavsadler

///Member
Update Mar-2020:

My mate was in the process of moving house during March, so I offered up my bakkie to make things a bit easier for him. It proved to be very useful as he moved into a complex which doesn’t allow any trucks in, so the bakkie had to shuttle boxes from the truck parked in the street and down to his unit at the bottom of the complex.

Anyways, a week after the move, he popped past his factory to check on a few things. He left the Ute in front of the main door to the factory. About 30mins later, he’s taking a leak, and while looking out the window, notices my Ute going down the hill in the neighbouring factory’s windows. So he thinks sh1t! someone’s trying to steal my Ute.

Now imagine this poor guy trying to run out the bathroom, pants at his knees, fumbling to open the security gate to get out. Phone goes flying and keys go flying. By the time he gets outside, my Ute is at the bottom of the hill, and has made friends with an X6 M – which was waiting at the main gate of the business park, ready to exit.

My Ute was parked in front of the Navara in the pic below:

jhaw5733_1237228359.jpg


capture_4003329854.jpg


tnof9136_3811606347.jpg


kkad4444_7103643788.jpg


Patched up, able to drive still:

uedl6784_4224964300.jpg


So.... what happened? Well it seems when he stopped, he didn't apply the handbrake fully (maybe 1-2 clicks), and it wasn't in gear. On the spot where he parked, it was a bit of a hump, the back wheels on one side, and the front wheels on the other side. For about 30mins that he was inside the shop, nothing happened. Then the forces of nature and powers that be must have decided it's time to liven up a sunday afternoon and set my Ute into motion, rolling down the hill.

The X6 does seem rather tough though, just a few scratches here and there.

It's just one of those unfortunate things, almost comedic, but at the same time disheartening and upsetting. He feels totally kak about it. He also locked the Ute before going into his factory, so no possibility of foul play.

Anyways in the days to come I'll update my threads with the damage assessment, cleanups and repairs. I've been busy on it a couple of hours a day over the past few weeks of lock down.
 

Tris

Honorary ///Member
This is terrible man, glad nobody was injured tho

Sent from my SM-G960F using Tapatalk
 

Benji

Well-known member
Thats terrible news man. Sorry to hear, but this seems like a good opportunity to upgrade a few things ;)
 

Missioner

Member
I used to work for GM in Menlyn a while back.

While there I had some opportunity to look deeper into the Corsa C platform and a few cars based on the same chassis.

One of those is the Tigra Convertible. I believe that 90% of the front end parts should be a direct fit. The remaining 10% should only require minor changes to work.

If I had the time and the money it's a swap I would be very keen to try. That and an X20LET.
 

gavsadler

///Member
Time to update this thread, a lot has been happening at home.

So the same day the accident took place, my mate brought the Ute back home.  Curiosity got the better of me, and I started to strip things off to assess the damage.  The intention would be to see what all was required, and try and source as much as possible before lockdown came into effect.  Then in between work, parental duties and household chores, I could spend time fixing things up as much as possible.

To start off, stating the obvious, the bonnet is KO. Closer inspection also revealed that he grille was cracked on both sides of the emblem (due to the twist):

View attachment 3


Cradle also looking rather sad, and I suspected the section behind the RHS headlight was also wonky:

View attachment 4


From the hit, the bumper took a knock, and this carried through to the inner parts. Intercooler bracket bent, and intercooler also bent (probably more damage behind the bumper as well):

View attachment 5

Wastegate actuator bent. This was worrying as it must have been quite an impact for the damage to travel this far into the engine bay.  From a bumper bashing, this is most likely expanding to needing a new intercooler, radiator, radiator fan, and (hopefully not) a turbo repair.

View attachment 6


Bumper stiffener broken as expected:

View attachment 7

View attachment 8

View attachment 9


You would also probably notice the oil leak under the Ute (again).  This is annoying, and would also be diagnosed and hopefully repaired in the weeks to come...

After removing the bumper stiffener, damage to the front of the intercooler was revealed. I suppose it could have been worse, but this is a potential boost leak right here:


The front side of the radiator also took a few hits where the intercooler pushed against it:

View attachment 1

View attachment 2


The passenger headlight bracket was also cracked on the bottom side:

View attachment 3

I made a list of things to try and source. And a couple of days later, I managed to get the body parts required:

View attachment 4


In the updates which follow, I'll document the repair process...
 

Attachments

  • IMG_0235 (Large).JPG
    IMG_0235 (Large).JPG
    302.1 KB · Views: 204
  • IMG_0347 (Large).JPG
    IMG_0347 (Large).JPG
    581.2 KB · Views: 196
  • IMG_0272 (Large).JPG
    IMG_0272 (Large).JPG
    200.9 KB · Views: 194
  • IMG_0271 (Large).JPG
    IMG_0271 (Large).JPG
    445 KB · Views: 196
  • IMG_0270 (Large).JPG
    IMG_0270 (Large).JPG
    449.4 KB · Views: 197
  • IMG_0269 (Large).JPG
    IMG_0269 (Large).JPG
    337.6 KB · Views: 199
  • IMG_0266 (Large).JPG
    IMG_0266 (Large).JPG
    348.2 KB · Views: 200
  • IMG_0265 (Large).JPG
    IMG_0265 (Large).JPG
    366.6 KB · Views: 202
  • IMG_0264 (Large).JPG
    IMG_0264 (Large).JPG
    453.8 KB · Views: 201
  • IMG_0242 (Large).JPG
    IMG_0242 (Large).JPG
    276.3 KB · Views: 201
  • IMG_0241 (Large).JPG
    IMG_0241 (Large).JPG
    386.9 KB · Views: 202
  • IMG_0237 (Large).JPG
    IMG_0237 (Large).JPG
    368.7 KB · Views: 205

Solo Man

Well-known member
Re the oil leak. We bought a secondhand 2005 Zafira OPC a few years back for my son when him and his family came back from the UK and he drove it two or three years. We had some recurring oil leaks from the tappet cover and on googling it i learned that this is a common problem and only solved by fitting a new tappet cover. Was not going to that expense so sealed it as best i could with gasket sealer and cleaned it regularly until my son sold the car. Otherwise, very nice car. Solid and planted with nice oomph. Just my 2c's
 

M135i

Well-known member
Tough one to swallow. On the bright side. New parts


Sent from my iPhone using Tapatalk
 

Missioner

Member
Solo Man said:
Re the oil leak. We bought a secondhand 2005 Zafira OPC a few years back for my son when him and his family came back from the UK and he drove it two or three years. We had some recurring oil leaks from the tappet cover and on googling it i learned that this is a common problem and only solved by fitting a new tappet cover. Was not going to that expense so sealed it as best i could with gasket sealer and cleaned it regularly until my son sold the car. Otherwise, very nice car. Solid and planted with nice oomph. Just my 2c's
I used to work for GM a number of years and you are correct.

The valve cover is made from plastic and over time it relaxes, the result is that there isn't enough pressure on the valve cover gasket for an effective seal and it leaks. The oil comes out more at the corners. Makes a bloody mess everywhere though.

Sadly there is no other option than to by a new valve cover. Some of the Chevs came with the same motor in them and didn't seem to leak as much, perhaps there lies a solution.
 

gavsadler

///Member
Agree with the above comments, the plastic valve cover does warp over time, it lifts in the middle, but also prone to leaks on the gearbox side of the cover. I replaced my gasket last year June and all is well on this side.

The leak is from the crank case breather pipe, it attaches to the block with 2 bolts, and there is a thin metal gasket between the 2, these are terrible gaskets (turbo oil return has the same type of gasket). I've repaired that by making a new gasket, will update the thread in due course with pics.

Drove the Ute this morning and I'm pleased to report it's all good.
 

Danny2

///Member
Good work there Gav... soon you gonna have your own Mechanical/Panelbeating shop at home :roflol:


As for the valve cover... having owned the Astra H OPC and had the same issue i had the cover replaced once under motorplan and once outta my motorplan(aka my pocket). What i dont understand is the stupid price that they have for the covers from GM SA. I was importing them from the Vauxhall dealers in the UK with shipping and customs for half the price of the cost.
 

gavsadler

///Member
Update April 2020:

Repairs officially started on 1 April.  In my mind, I attempted to try and plan a sequence of events, mostly focusing on the mechanical side first and then progressing towards the bodywork side of things.

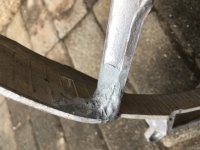
First up, was to look at the radiator fan. After removing it from the Ute, I noticed that one of the arms of the housing was cracked.  Thankfully there was little / no movement on this arm, so I reckoned some good old Pratley Steel would come  in useful now. (I shudder to think what the cost of a new fan housing would be, also because you cannot find these things used anywhere! (I'm lucky to have a spare in storage should I ever need it in future).

Some pics of the crack:

View attachment 7

View attachment 8


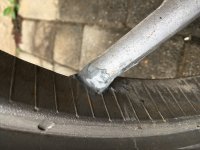
And some pics after the repair, strong and functional (if not the prettiest):

View attachment 9


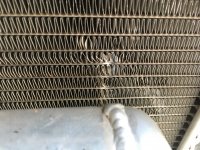
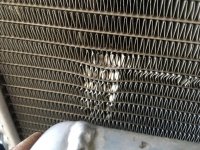
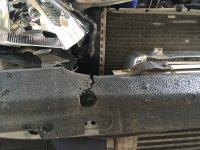
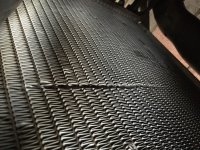
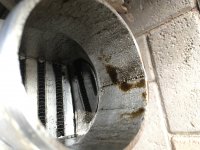
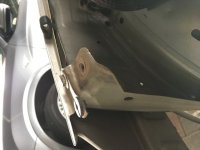
Also, with the fan removed, I could inspect the other side of the radiator.  As is to be expected, it's taken a hit from the pressure, and the fan housing has squashed the fins a bit:

View attachment 1


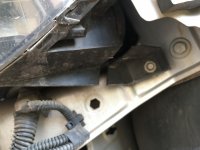
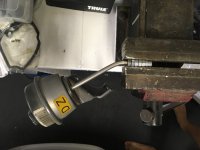
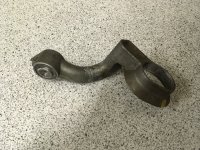
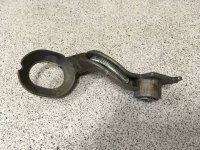
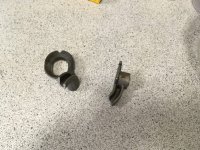
I had previously noted that the turbo also took a hit, more specifically the wastegate actuator.  This wasn't going to work well, and I was a bit concerned that it actually damaged the wastegate arm itself.  The only way to find out would be to remove the actuator.  This is a much easier job now with everything removed out the way, and in no time it was stripped off.  Thankfully, the wastegate arm is still ok and opens and closes as it should without any resistance.  Yay (no turbo spares required).

Next step was to straighten the actuator rod.  I used some mild panelbeating skills, and a bunch of nuts so as not to damage the threads.  Before and after pics below:

View attachment 2

View attachment 3

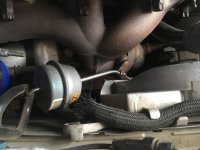
Success.  I then reinstalled this onto the turbo. while I was busy with that, I noticed that my O2 sensor in the downpipe was a bit loose (must be from vibrations), so I nipped that up as well.  Job done.

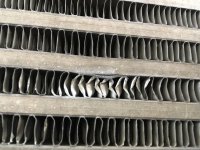
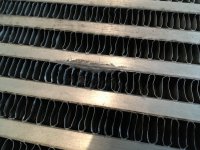
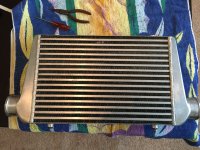
A few days later, I was ready to tackle the intercooler.  There was the 1 obvious hit which may have been a potential boost leak, as well as straightening of some fins here and there.  Also, the cooler had a good 8 years of dirt and grime build up on it, so after removing, I first gave it a thorough clean, using a combination of Prepsol, steel wool and sponges.

Also note the oil buildup in the cooler.  This is from when the turbo seals failed previously (this buildup would also occur if any oil breather pipes are plumbed into the induction (mine aren't - they go to the oil catch can).

View attachment 4


After a good couple of hours squinting up close and personal with the cooler, I had straightened up the fins as best as I could, and it looks so much better after the clean as well:

View attachment 5


When I was cleaning the cooler as well, I filled it with water, sealed off the ends and added some air pressure.  Pleased to report that there are no leaks from anywhere.  When I was straightening the fins, I just added some Pratley Steel to the damaged spot for just in case...

View attachment 6


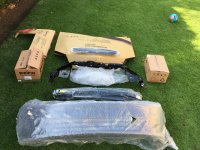
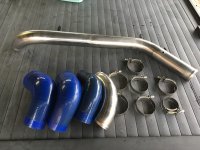
I also got round to cleaning and polishing the boost pipes and clamps, so that they are ready for reinstall at a later stage:

View attachment 7


3-5 April:

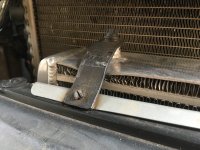
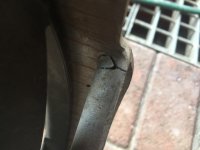
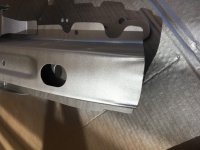
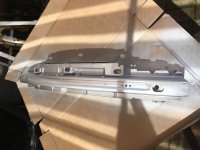
Next up, to repair the broken radiator bracket from the RHS.  This is a cast piece, but conveniently it's only got 3 sides, and 'hollow' to some degree.  So I thought I would have a go at making a bit of a splint for it, and then using my trusty Pratley Steel again.  An 8mm piece of threaded bar was sacrificed to make the splint, and it all turned out rather well I think (probably stronger than it was before):

View attachment 8

View attachment 9


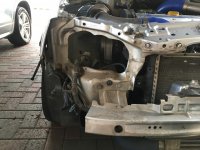
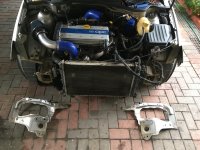
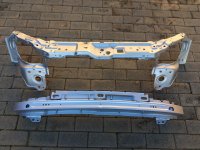
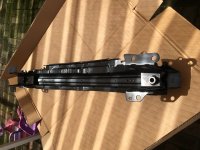
Next up, to look at the front cradle / slam tray / valance.  The RHS was a bit wonky, and from the hit, it had also pushed slightly on the tag on the chassis leg where the slam tray attaches to.  Initially I had thought that it was the fender, but the tag is on the chassis leg itself.

Removing the old bits off:

View attachment 1

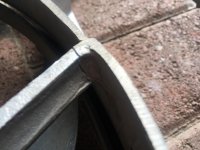
And here are pics of the RHS and LHS tags on the chassis legs, you will notice that the gap on the RHS is wider than the LHS:

View attachment 2

View attachment 3


I set about doing some DIY panelbeating, starting off with massaging the RHS tag upwards and forwards to close the gap a bit.  This took quite a bit of time, but I wanted to do it slowly and make sure that I didn't cause any other issues.  Eventually I got it right.

Then came a huge, annoying PITA job.  When I bought my spares, the 2 headlights I got were different brands. I didn't think too much of it because I did inspect them visually and from the front the look identical.  For the most part, even the back housings are pretty much the same.  I was wrong.  The RHS headlight had a stupid moulding which interferes directly on the closest spot where it meets the valance.  I couldn't modify the housing, so I had to apply some panelbeating skills to the valance itself to free up some room so that the headlight could fit properly.  This took an even bigger amount of time, I probably spent 3-4hrs on this doing it bit by bit.  Anyways, got it done and the headlights fit properly.

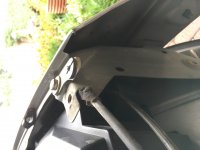
I then moved onto the new bonnet. My intention was to make sure everything fits, before proceeding with prep for painting etc.  So with some help I managed to install the bonnet on the hinges.  Everything lined up good, but some adjustments would be necessary.  

View attachment 4

I then thought about installing the mounting pins for my bonnet struts, but working upside down was a mission, as I had to drill some access holes in the crash structures in order to fit a locking nut onto the pins.  So the bonnet came off again, fitted the pins in the space of 30mins, and then refitted the bonnet for another test, note in this picture I tried fitting the original LHS section of the valance, but there were some issues with alignment with the centre section, so I eventually ended up using all 3 sections of the new front valance.

View attachment 5

Things were progressing nicely, and I was now comfortable to begin with the next phase of the repairs: prep for painting....


7-12 April:

To be honest, painting the panels had be a bit worried. I have not actually painted any body panels on a car previously, but knowing I had some equipment at home, I decided to take a chance.  Worst case, it looks completely crap and I would need to send it to a panelbeater anyway.  (Not sure if I did mention it previously, but before lockdown I went to my local panelbeater who's done work on my cars before, and they actually turned me away, saying they don't paint supplied panels because it impacts on their profit margin as they can't source the parts themselves.  I was a bit amused with this, but if that's what floats your boat, then so be it.  I'd love to see their attitude now after all this lockdown nonsense, I don't think any business will be in a position to turn away work.  Anyway... I digress).

Before lockdown, I managed to get some paint mixed up, and also purchased clear coat and some body filler (in case I needed it). At home I've got a baby compressor, and a brand new spray gun which I purchased from the previous house owner when we moved in.  It didn't have any brand on it, so I assume it's a generic piece, and not a professional gun by any means. But... I was keen to try.

After a few hours of Youtube in the evenings, and consulting with a forumite who's done this before, I was ready to commence. I planned to do the valance and bumper stiffener as my first attempt, as these do not need to be perfectly finished, and will be relatively hidden from sight most of the time.

First steps were to roughen up the primer paint on the parts, I used an abrasive pad to do this.  Once all was done, a wipe down with some acetone / benzyne to remove dust and other debris was done prior to painting. 

View attachment 6

Onto the paint itself, the paint shop told me the silver was ready to go.  I decided to add a splash of thinners just in case, as the paint did feel quite thick. I did about 2 coats of silver on these parts and that sat to dry for a few hours.  Once dry, I did about 2 coats of clear over the top.  Overall, my first painting attempt was so-so, as I had to learn how the gun and compressor work best 'on the fly'. Some parts came out decently, but other spots I got a fuzzy texture, which points to the paint drying in the air before landing on the parts.  (I should probably also point out that this was a proper backyard job, no spray booth etc, and uncontrollable weather conditions, so yes, there was bound to be some dust, wind and other factors contributing to the outcome.

Nevertheless, some pics of the completed parts:

View attachment 7

View attachment 8

View attachment 9


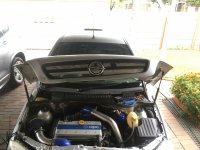
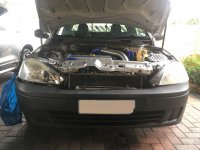
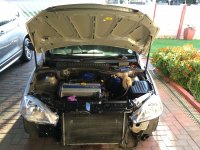
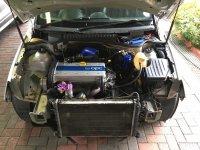
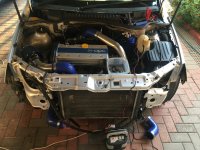
I decided to leave the parts to dry properly in the sun for at least a day before reinstalling.  While this was happening, I took the time to give the engine bay a decent clean everywhere (this would also help in tracing that pesky oil leak).  A pic of things cleaned up (I didn't spend much time on the radiator as the intentions are to replace it at some point):


View attachment 1


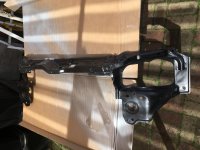
Eventually I was ready to reinstall the painted cradle onto the Ute:

View attachment 2


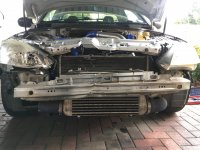
Next steps... reinstall intercooler and boost pipes, but thats in the next update...
 

Attachments

  • IMG_0804 (Large).JPG
    IMG_0804 (Large).JPG
    261.2 KB · Views: 106
  • IMG_0802 (Large).JPG
    IMG_0802 (Large).JPG
    330.6 KB · Views: 104
  • IMG_0612 (Large).JPG
    IMG_0612 (Large).JPG
    194.6 KB · Views: 105
  • IMG_0611 (Large).JPG
    IMG_0611 (Large).JPG
    244.5 KB · Views: 105
  • IMG_0622 (Large).JPG
    IMG_0622 (Large).JPG
    502.7 KB · Views: 105
  • IMG_0617 (Large).JPG
    IMG_0617 (Large).JPG
    253.9 KB · Views: 104
  • IMG_0618 (Large).JPG
    IMG_0618 (Large).JPG
    254.1 KB · Views: 104
  • IMG_0828 (Large).JPG
    IMG_0828 (Large).JPG
    324.6 KB · Views: 102
  • IMG_0825 (Large).JPG
    IMG_0825 (Large).JPG
    320.1 KB · Views: 102
  • IMG_0824 (Large).JPG
    IMG_0824 (Large).JPG
    575.2 KB · Views: 103
  • IMG_0821 (Large).JPG
    IMG_0821 (Large).JPG
    320.5 KB · Views: 104
  • IMG_0879 (Large).JPG
    IMG_0879 (Large).JPG
    443.7 KB · Views: 97
  • IMG_0877 (Large).JPG
    IMG_0877 (Large).JPG
    371.9 KB · Views: 98
  • IMG_0863 (Large).JPG
    IMG_0863 (Large).JPG
    195.4 KB · Views: 99
  • IMG_0862 (Large).JPG
    IMG_0862 (Large).JPG
    215.5 KB · Views: 98
  • IMG_0861 (Large).JPG
    IMG_0861 (Large).JPG
    438 KB · Views: 98
  • IMG_0832 (Large).JPG
    IMG_0832 (Large).JPG
    556.4 KB · Views: 99
  • IMG_0830 (Large).JPG
    IMG_0830 (Large).JPG
    538.3 KB · Views: 98
  • IMG_0829 (Large).JPG
    IMG_0829 (Large).JPG
    411.7 KB · Views: 98
  • IMG_0988 (Large).JPG
    IMG_0988 (Large).JPG
    425.3 KB · Views: 92
  • IMG_0932 (Large).JPG
    IMG_0932 (Large).JPG
    528.1 KB · Views: 89
  • IMG_0924 (Large).JPG
    IMG_0924 (Large).JPG
    334.8 KB · Views: 91
  • IMG_0923 (Large).JPG
    IMG_0923 (Large).JPG
    434.2 KB · Views: 91
  • IMG_0922 (Large).JPG
    IMG_0922 (Large).JPG
    311.7 KB · Views: 89
  • IMG_0912 (Large).JPG
    IMG_0912 (Large).JPG
    306.9 KB · Views: 89
  • IMG_1020 (Large).JPG
    IMG_1020 (Large).JPG
    435.9 KB · Views: 90
Top