Gavsadler's X3 35i M-Sport

gavsadler

///Member
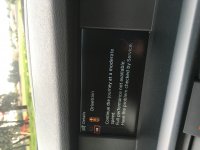
Oh yes, something else I forgot to update with.

Rear brake pads were nearing end of life, so ended up buying oem. Fitted these together with a new sensor.

Also, whilst doing that, we did a repair on the rear outer cv boot which was torn. As with many jobs on this car, a bit of a PITA. The cv joint wouldn’t come off the shaft, and bar pulling the whole driveshaft out of the diff, we decided on another fix.

A bit agricultural, but ended up cutting the cv boot, slipping it over the CV and then superglueing the boot together again. I’m pleased to report that it is holding up well.

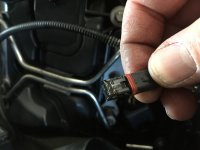
Also, while doing this, we noticed that the link for the stabilizer bar was completely broken off. What’s even more worrying is that it was tucked up nicely out of the way behind the dust cover for the disc.

Now I would expect that because this link hangs vertically, if it broke, it would still hang in a more or less vertical position?

I can’t prove it, but I suspect the last time someone worked on the back of this car was BMW just after we bought it 2 years ago. Maybe it was broken then and they chose to ignore fixing it? So it was tucked away.

Anyway, I managed to source one from an X3 at a local scrappy and fitted that.

Sadly for all of this, I had lots of pics, but a phone malfunction / user error means I lost everything.
 

gavsadler

///Member
Update June 2019:

Well this is a loooooong overdue update, apologies in advance.

So after the festive season, the itch was lingering to fiddle on the car again. Something I've wanted to try out was a downpipe on the car. There are the minimal performance gains through elimination of the catalytic converter, but more so, I wanted to unlock some sounds of the turbo spooling up, and also get rid of the vrot eggs smell which sometimes envelopes the car after a spirited drive (note: as a responsible parent, I don't do spirited drives in the family car)

:fencelook:

Anyways, after much discussions with Danny from DSC Motorsport, he convinced me not to spend huge cash on importing a DP from the states, and that we should fabricate locally. He has a contact who is an excellent welder, so we decided to come together and make it happen. My car would be the guinea pig for development, Danny the gopher / spanner boy / road runner, and Gareth the welder supremo.

So, early one morning, the car went up on trestles, and some stripping took place to remove the cat:

img_5782 (large)_4993217531.jpg


img_5790 (large)_1025782632.jpg


Still looking fairly clean all things considered:

img_5789 (large)_1696095177.jpg


img_5791 (large)_8718223115.jpg


Here's a view of the mid-pipe on the X3 - it's an 80mm monster!

img_5792 (large)_6705436068.jpg


And the business end up top:

img_5793 (large)_6220838972.jpg


Once the Cat was removed, we set about measuring and mocking up for the fabrication of the new DP.

The X3 uses the PWG turbo, which has the 3.5in outlet. Here is the flange made up:

img_5802 (large)_5631414023.jpg


From the flange, a short spacer section and then a mild bend:

img_5803 (large)_9160583233.jpg


Also, starting from the mid-pipe, note how this DP actually slots into the rest of the exhaust, whereas on the other x35i cars, they make use of a flange:

img_5804 (large)_370878954.jpg


Completing the mockup and welding of the DP, including adding the bungs for the O2 sensors:

img_5805 (large)_5631743697.jpg


img_5813 (large)_5462789023.jpg


img_5814 (large)_5631743697.jpg


The completed DP next to the stock catalytic converter:

img_5827 (large)_9839730523.jpg


And to end off: the DP installed in the car:

img_5828 (large)_1788647309.jpg


Before I go any further, I must extend huge thanks to Danny. He took time out of his day (well 2 days) to help strip, grind sections, run around for parts and machining, and install the finished product. Thank you again kind sir.
Also thanks to his mate Gareth (G Force) for the superb workmanship, I think the pics of the welds speak for themselves.

I’ve done a couple of videos which I’ll upload to Youtube and then post the links here…


Some videos:

[video=youtube]

[video=youtube]

[video=youtube]

[video=youtube]

[video=youtube]

[video=youtube]https://youtu.be/KyVoyUStnQA[/video]
 
gavsadler said:
Update June 2019:

Well this is a loooooong overdue update, apologies in advance.

So after the festive season, the itch was lingering to fiddle on the car again. Something I've wanted to try out was a downpipe on the car. There are the minimal performance gains through elimination of the catalytic converter, but more so, I wanted to unlock some sounds of the turbo spooling up, and also get rid of the vrot eggs smell which sometimes envelopes the car after a spirited drive (note: as a responsible parent, I don't do spirited drives in the family car)

:fencelook:

Anyways, after much discussions with Danny from DSC Motorsport, he convinced me not to spend huge cash on importing a DP from the states, and that we should fabricate locally. He has a contact who is an excellent welder, so we decided to come together and make it happen. My car would be the guinea pig for development, Danny the gopher / spanner boy / road runner, and Gareth the welder supremo.

So, early one morning, the car went up on trestles, and some stripping took place to remove the cat:

img_5782 (large)_4993217531.jpg


img_5790 (large)_1025782632.jpg


Still looking fairly clean all things considered:

img_5789 (large)_1696095177.jpg


img_5791 (large)_8718223115.jpg


Here's a view of the mid-pipe on the X3 - it's an 80mm monster!

img_5792 (large)_6705436068.jpg


And the business end up top:

img_5793 (large)_6220838972.jpg


Once the Cat was removed, we set about measuring and mocking up for the fabrication of the new DP.

The X3 uses the PWG turbo, which has the 3.5in outlet. Here is the flange made up:

img_5802 (large)_5631414023.jpg


From the flange, a short spacer section and then a mild bend:

img_5803 (large)_9160583233.jpg


Also, starting from the mid-pipe, note how this DP actually slots into the rest of the exhaust, whereas on the other x35i cars, they make use of a flange:

img_5804 (large)_370878954.jpg


Completing the mockup and welding of the DP, including adding the bungs for the O2 sensors:

img_5805 (large)_5631743697.jpg


img_5813 (large)_5462789023.jpg


img_5814 (large)_5631743697.jpg


The completed DP next to the stock catalytic converter:

img_5827 (large)_9839730523.jpg


And to end off: the DP installed in the car:

img_5828 (large)_1788647309.jpg


Before I go any further, I must extend huge thanks to Danny. He took time out of his day (well 2 days) to help strip, grind sections, run around for parts and machining, and install the finished product. Thank you again kind sir.
Also thanks to his mate Gareth (G Force) for the superb workmanship, I think the pics of the welds speak for themselves.

I’ve done a couple of videos which I’ll upload to Youtube and then post the links here…


Some videos:

[video=youtube]

[video=youtube]

[video=youtube]

[video=youtube]

[video=youtube]

[video=youtube]https://youtu.be/KyVoyUStnQA[/video]


Hi bud, some nice work there. 2 things to highlight if I may.
1. The flange is actually an off the shelf unit called a triclover ferrule.
2. It would have been a good idea to add the flex pipe to absorb engine movement. Without it, it will put stress on the welds.
Was it a purge weld?
Granted, you probably don't drive spiritedly alot as you say so you may be safe.

I used to work for a company that sells those stainless steel fittings and tubing and also dealt with welding projects.
 

gavsadler

///Member
1) you are correct, we bought the flange and lengths of stainless pipe and a few bends to make up the DP. I was probably thinking one thing and typing another earlier, apologies. I should have said we welded a short spacer and a sliced bend to the flange section.

2) I’m not 100% sure about the purge welding. We did consider adding a flex joint, but given the mounting of the DP to the turbo and enough movement on the rest of the pipe, we decided to just make it with no flex.


Also just to add: in the last 3 videos (in car) you will hear a bit of hissing. This was a bit of blow by where the DP fitted into the midpipe, I just turned the clamp up another 2 turns and it was sorted.
 
gavsadler said:
1) you are correct, we bought the flange and lengths of stainless pipe and a few bends to make up the DP. I was probably thinking one thing and typing another earlier, apologies. I should have said we welded a short spacer and a sliced bend to the flange section.

2) I’m not 100% sure about the purge welding. We did consider adding a flex joint, but given the mounting of the DP to the turbo and enough movement on the rest of the pipe, we decided to just make it with no flex.


Also just to add: in the last 3 videos (in car) you will hear a bit of hissing. This was a bit of blow by where the DP fitted into the midpipe, I just turned the clamp up another 2 turns and it was sorted.


Cool. I actually just had a look at a pic that I missed earlier. It's definitely not purge welded- it's a process where they block inlet and outlet and then put some of the argon inside so as to create a weld from the inside and get full penetration. That's my understanding, I'm not a welder but know a little. It would also allow for smoother flowing over the welded joints and not be restricted by the sharp edges in the joint - this won't have too much effect on a boosted car though. His welding looks good though.
Most of what I mentioned above is just a suggestion if you want to perfect what you did. Being in that industry and knowing some of the top exhaust places in Cape Town, I can confirm that they don't purge weld either.


J-10-M

Member
200 octane said:
gavsadler said:
1) you are correct, we bought the flange and lengths of stainless pipe and a few bends to make up the DP. I was probably thinking one thing and typing another earlier, apologies. I should have said we welded a short spacer and a sliced bend to the flange section.

2) I’m not 100% sure about the purge welding. We did consider adding a flex joint, but given the mounting of the DP to the turbo and enough movement on the rest of the pipe, we decided to just make it with no flex.


Also just to add: in the last 3 videos (in car) you will hear a bit of hissing. This was a bit of blow by where the DP fitted into the midpipe, I just turned the clamp up another 2 turns and it was sorted.


Cool. I actually just had a look at a pic that I missed earlier. It's definitely not purge welded- it's a process where they block inlet and outlet and then put some of the argon inside so as to create a weld from the inside and get full penetration. That's my understanding, I'm not a welder but know a little. It would also allow for smoother flowing over the welded joints and not be restricted by the sharp edges in the joint - this won't have too much effect on a boosted car though. His welding looks good though.
Most of what I mentioned above is just a suggestion if you want to perfect what you did. Being in that industry and knowing some of the top exhaust places in Cape Town, I can confirm that they don't purge weld either.


Slightly off topic, but whom of the exhaust places would you recommend in CPT? Best 3 in no particular order?

That X35i sound incredible!


Sent from my iPhone using Tapatalk
 
Double post


J-10-M said:
200 octane said:
gavsadler said:
1) you are correct, we bought the flange and lengths of stainless pipe and a few bends to make up the DP. I was probably thinking one thing and typing another earlier, apologies. I should have said we welded a short spacer and a sliced bend to the flange section.

2) I’m not 100% sure about the purge welding. We did consider adding a flex joint, but given the mounting of the DP to the turbo and enough movement on the rest of the pipe, we decided to just make it with no flex.


Also just to add: in the last 3 videos (in car) you will hear a bit of hissing. This was a bit of blow by where the DP fitted into the midpipe, I just turned the clamp up another 2 turns and it was sorted.


Cool. I actually just had a look at a pic that I missed earlier. It's definitely not purge welded- it's a process where they block inlet and outlet and then put some of the argon inside so as to create a weld from the inside and get full penetration. That's my understanding, I'm not a welder but know a little. It would also allow for smoother flowing over the welded joints and not be restricted by the sharp edges in the joint - this won't have too much effect on a boosted car though. His welding looks good though.
Most of what I mentioned above is just a suggestion if you want to perfect what you did. Being in that industry and knowing some of the top exhaust places in Cape Town, I can confirm that they don't purge weld either.


Slightly off topic, but whom of the exhaust places would you recommend in CPT? Best 3 in no particular order?

That X35i sound incredible!


Sent from my iPhone using Tapatalk


Hi bud, sadly I don't have an answer for you. All of these places have dyno's to prove why they are better than the next. My work had nothing to do with exhausts or car performance products, I dealt with process flow lines for food and bev industry. It just so happens that a few exhaust places bought stainless steel fittings from us.
If I was in need though for an exhaust for a boosted car, I'd get my friend to do it for me. NA cars are a bit more complex to my understanding.
 

gavsadler

///Member
Update Aug-2019:

I've been a bit slow to get my updates onto the forum, mostly because I've been swinging spanners left, right and centre on the other cars.

For this car, the DP stayed on the car for 1 week. I think I did mention it in the last post, but my Mrs wasn't a fan of the sound. Given that this is her car, and a happy wife = happy life, I obliged to remove the noise maker, lol.

So Danny came through again and assisted in taking it off. I did try swing the idea that maybe it could be an interesting conversation starter for the dining room table if we converted it to become a flower vase. That idea was also swiftly dismissed :smilebounce:

I haven't spoken about the JB Stage 1 fitted on the car. This we did at the same time as fitting the DP. This unit is still fitted to the car. I'm pleased to report that there haven't been any software issues or fault codes related to this. In terms of performance, I wouldn't really say there is a noticeable / significant gain, but that's also not the point of this unit. It's a small bump up in power / torque. I may also be used to the power delivery of the car, although Danny did comment that it did feel a little fresher in the midrange. Again, this is not a "performance car" as such, and it's daily duties mostly comprise of the school runs and short trips to and from clients. Very seldom do I drive the car alone, and when I do I also only stretch it's legs once or twice on short blasts.

It's still great fun though, plenty get up and go for a fairly big car, and I think it's actually deceptive how quickly the speed picks up through the gears.

It's due for a service next month, so I will post some pics when that happens. Also planning at tyre rotation front to back. About 2 weeks ago, we got a battery discharged warning, but a night on the trickle charger seems to have topped it up again and it hasn't given another warning. But I'm probably going to have to cough for a new battery within the next few months, that's my sneaky suspicion.

Until next time...
 

gavsadler

///Member
Oh, I also forgot to add: a couple of months back I managed to find a set of Thule roof racks and mounting points for the X3. One of the special pins was missing though, and the Thule Partner in the east rand was a bit useless at helping, telling me I needed to buy a pair of new mounting points for R900.

So, I went to my local steel merchant, bought 0.5m of round bar for R9 (yes, nine rand), got home and cut off a 11cm long piece. A little bit of machining, and tapping of some holes for the bolts and I had a replacement. So in effect, it cost me R1.80 for my replacement part.

Some pics of the racks fitted:

img_0645 (large)_9945492296.jpg


img_0646 (large)_4365796192.jpg


img_0647 (large)_1627162894.jpg


img_0648 (large)_6267274755.jpg
 

gavsadler

///Member
I can't believe I haven't updated this thread in 6 months, better get that corrected.

Sep-2019:

Service time for the X3. Looking at the air filter, it was still fairly clean, so I decided to leave it in for a few more months.

img_3156 (large)_9324482686.jpg


The cabin air filter is also ok, even though it's done 25000kms. I'll probably change this at the next service:

img_3157 (large)_1498006049.jpg


The oil, well probably par for the course, and I'm sure the short trips also didn't help matters much:

img_3161 (large)_7198324139.jpg


New oil filter ready to go in:

img_3175 (large)_9558174525.jpg


And that was that in terms of servicing. Next steps: rotate wheels front to back.

A week after the servicing, I planned to rotate the wheels. Sadly though, for some reason, the locknut went missing (not sure how this happened, but anyway). I was unable to get the wheels off. No problem I thought, I'll go to the dealer and they can test with their master set to get the correct code.

So off I go to BMW Isando, where the dude brings out his key set. He finds one which fits, puts powa, and strips the locknut. Joy.... It seems like that key wasn't quite right for the nut. Closer inspection reveals that the key was already previously butchered, so that's why it didn't fit in the nut. So now his key is stuffed, and I have 1 stuffed locknut and 3 wheels yet to be loosened. Oh and they dont have stock of the key.

Off I go to ABM, one of their service guys assists, but complains that a normal wheel spanner doesn't have enough leverage to loosen the nut. This had me worried, because they should come off no problem. Anyway 5mins later he comes out saying 3 nuts are off, but the stripped nut is a no-go, I'll need to make another plan.

To cut a long story short, I ended up buying a few sockets in assorted sizes and designs to knock over the locknut. Eventually I got it split into 2 pieces, with the main head part splitting from the rest of the nut (it uses a very fine spline). I then welded the head onto a normal wheel nut head (with the threads cut off), and then was able to get it to locate again with the threads in the wheel.

Lots of praying, and I managed to get the stubborn nut out. Here's a pic of the creativity:

img_e4009 (large)_4690856239.jpg
 

gavsadler

///Member
Fast forward to Mar-2020, and we were a couple of weeks away from our annual holiday to the South Coast. The car popped up a warning that the front brake pads needed replacement. I organised a set from ABM and then proceeded to do the job one saturday morning. After pulling the wheels off, the pads did still have some life left, but in the interests of peace at home, I decided to carry on fitting the new parts.

Some pics below of the old pads and sensor, and the new parts:

img_9199 (large)_6836277396.jpg


img_9202 (large)_9651260247.jpg


img_9203 (large)_8228558705.jpg


img_9205 (large)_555887845.jpg


img_9209 (large)_8208617185.jpg
 

gavsadler

///Member
Moving forward to end of March, things are going awry with the news of COVID-19 and the pending lockdown. Amongst other things, there was an incident with my bakkie (still to be documented), and I was scrambling to get replacement parts.

Anyways, on the Wednesday before lockdown, as I arrived home in the X3, I was presented with this:

<iframe width="1044" height="587" src="
" frameborder="0" allow="accelerometer; autoplay; encrypted-media; gyroscope; picture-in-picture" allowfullscreen></iframe>

Funny how it happened as I was arriving home. So as luck would have it, Danny was planning a trip to ABM, so I arranged that he collect a gasket for me while he was there. Thankfully I could get the gasket the next day.

Some more pics of the leak, a bit difficult to see but you can see oil where there shouldn't be any, and the O2 sensor was soaked.

img_0336 (large)_4014776389.jpg


img_0337 (large)_8537408807.jpg


img_0338 (large)_9056351508.jpg


img_0476 (large)_714033320.jpg


Next up, the job of replacing...
 

gavsadler

///Member
There is quite a lot of space in the X3's engine bay, but it still required a fair bit of stripping and loosening of things in preparation of removing the rocker cover. I got to this point where I thought I was ready:

img_0491 (large)_2085331847.jpg


After a few minutes of swearing, I had to remove the top bracing strut, as it was causing the cover to hook about 2mm on the back of the head somewhere.

Success:

img_0495 (large)_9188900932.jpg


On closer inspection though, there seems to be a significant amount of sludge buildup on top. I do the services regularly, so this is either historical buildup, or I need to service even more frequently.

img_0498 (large)_2125158261.jpg


img_0499 (large)_1513660742.jpg


After some time cleaning, it was looking a lot better:

img_0506 (large)_6598621648.jpg


img_0507 (large)_2967793365.jpg


Moving on to cleaning and prepping the valve cover for the new gasket:

img_0510 (large)_2021569788.jpg


img_0511 (large)_3034947843.jpg


img_0512 (large)_1678867335.jpg


img_0514 (large)_5992512293.jpg


I also pulled the plugs whilst everything was open to inspect how things are looking. Cyl1 on the left, Cyl6 on the right:

img_0523 (large)_1926972050.jpg


Thereafter, I pretty much reversed the steps to close up everything. All in all, I probably spent close on 10hrs doing this job slowly and carefully.

After closing up and starting the car, there were some splutters and misses to be expected, as fuel made its way back to the injectors and so on. Driving up and down the road again also removed some other faults.

The car stood for a few days, until Tuesday when I used it to go collect some groceries. There was a bit of a missfire at low throttle opening, but no faults popped up. On the way home, I squeezed the throttle a bit more, and then the car went crazy: Drivetrain fault and limp mode (limited performance). It sounded like a Datsun Go as well. There was barely any power and the car was definitely not happy the last 2kms home.

I scanned the car later on, and it showed misfires on cyl5 and cyl6. I wasn't pleased at the prospect of having to strip everything off again. After clearing codes, the car started up fine without any issues.

Subsequently, I started it again today and there were no issues, started fine, idles fine, revs fine. However I suspect the misfire gremlims will come back when things get hot. So I'm probably in for a few coilpacks after lockdown.

That's all updates I have for now, at least things are up to date lol
 

gavsadler

///Member
IT had FSH at BMW before we bought the car, subsequent to that, I've purchased the same 5w30 BMW oil.

It's probably the long intervals in it's earlier days, I'll look to do a bit of an engine flush at the next service.
 

gavsadler

///Member
Oh, also forgot to add that the car went to ZF for the gearbox oil service in March.

Excellent service from the guys there. Overall, the clutches are within spec for pressure and time values, it's only the transfer case which is starting to go out of spec. I'll monitor the car for any bad shudders or vibrations at low speed maneuvering, but for now they said it is ok.
 

gavsadler

///Member
Update May-2020:

Subsequently repairing the valve cover gasket, this car has been the one to perform the weekly shopping trip during lockdown, which involves literally driving 1km, picking up our order and 1km back home (or 2 or 3 or 4 in my case, needed to warm up the car haha).

First trip after fixing the car, and it goes into limp mode (mentioned in my last post), after clearing codes, driving it again would trigger limp mode as soon as it started to boost hard.

View attachment 4

View attachment 5

Scanning the car, it was showing misfires on cylinders 5 and 6.  Of course the issues had to be on the crappiest places to get to.  Anyway, strip everything off, inspect wiring and all looks ok. I then decided to swap out the coils with those from cylinders 1 and 2, if the problem moves, then I know it's the coils.

View attachment 6

Refit everything again, go for a drive, limp mode is back.  Back home, scan the car and it's still showing misfires on cylinders 5 and 6. #$@&* lol

Strip everything off, and this time I swapped out the plugs with 2 older ones which I still had from last time I changed them.  At this stage it was getting late and I was gatvol, so the car stood a few days before the next trip.

Plugs which came out the car (possibly faulty):

View attachment 7

And these are my old plugs which I was going to put back in:

View attachment 8

The following week, go for a drive to fetch the weekly groceries, car feels good.  Then, as soon as it was warm and there was some clear tarmac ahead, as soon as it came into boost, it went into limp mode again.  Funny thing though, it was still running fairly smoothly in limp mode (and not like a Datsun Go as it did previously),g

Get home and scan the car again, low and behold cylinders 5 and 6 fault codes are now resolved. But, a new fault this time.  Now it's cylinder 4 giving the nonsense, but at least it's only the intake pipe that needs to be stripped off to get there.

So (i'm getting good at this now), strip off everything, and I swapped the coil with that from cylinder 3.  Go for a drive, limp mode comes back, and I go home again to scan.  The issue is still on cylinder 4, so I swapped out this plug as well with one of my older ones.  Clear codes and go for a drive.  You guessed it, limp mode is still there. %$#@

Back home, I scan the car, and it's still cylinder 4 giving an issue, but the coil and plug are swapped, so now it's either wiring or the injector.  Stripping off everything again, I checked the wiring.  The earth was secure, and coil plug was attached securely, so I checked the injector plug:

View attachment 9

Some oil and muck on the plug, this must have happened when I swapped over the valve cover, it must have touched somewhere to get dirty and I missed this when reassembling and cleaning. My bad.  Anyways clean up, refit everything and start the car to make sure it's running properly.  All was good, but my gatvol level was at an 8, so I didn't go drive again.

Fast forward another few days, and I'm ready for another trip.  Head off and all feels good. Once warmed up, boost it a bit, and it goes into limp mode - again.  Now I'm really getting frustrated, the past week or 2 of troubleshooting has given me lots of time to reflect on whether I need to give up or not.  But that's the worst feeling for me, so back home to scan and continue troubleshooting. Funnily enough, the car still ran very smoothly in limp mode, and even enjoyed revving up a bit.

So back home, after scanning the car, I got this:


A boost leak.  Damn.  Back home and strip everything off as I had an idea where the problem was.  On these cars, there is as small vacuum line which runs over the top of the motor, which is made of a hard plastic.  It's prone to cracking, and I've done a quick fix repair on it previously when I noticed it was looking sad in some places.  Well my quick fix was still working, but it had now cracked off in another place, this could have been with all the work taking place on top, moving things around all the time.

Here's the piece which cracked off, just under the intake pipe:

View attachment 1

So I scratched in my stash, and found a length of silicone hose, so I've now done a permanent repair and replaced the entire length of vacuum pipe. Old and new in the pic below:

View attachment 2


Reinstall everything and go for a drive. Voila! No more issues.  It actually felt weird to drive the car and it felt normal with no limp mode.  And it felt stupidly fast when accelerating through the rev range lol.

Scanning the car subsequently has also shown no new fault codes.  All this testing and short trips though isn't helping fuel consumption. Currently sitting on 20.2l per 100kms.  And after a longish trip (30kms) the other day, it's now on 18.8l per 100kms.

I'm just glad it's sorted now. This was literally 2-3 weeks of hassling and worrying about the car.

Thanks for reading my long rant.

To end off, I have given the interior a proper clean, washed the floor mats, cleaned the leather, applied leather cream etc.  I find cleaning cars relaxing and therapeutic, so it almost helped me to de-stress and love the car all over again...
 

Attachments

  • IMG_1090.JPG
    IMG_1090.JPG
    2.4 MB · Views: 140
  • IMG_1096.JPG
    IMG_1096.JPG
    3.6 MB · Views: 140
  • IMG_1131.JPG
    IMG_1131.JPG
    2 MB · Views: 140
  • IMG_1137.JPG
    IMG_1137.JPG
    3.3 MB · Views: 138
  • IMG_1138.JPG
    IMG_1138.JPG
    2.3 MB · Views: 136
  • IMG_1146.JPG
    IMG_1146.JPG
    1.8 MB · Views: 134
  • IMG_1245.JPG
    IMG_1245.JPG
    4.1 MB · Views: 134
  • IMG_1264.JPG
    IMG_1264.JPG
    2.2 MB · Views: 136
  • IMG_1266.JPG
    IMG_1266.JPG
    2.6 MB · Views: 133

gavsadler

///Member
Guess who's back.... back again....

Not Slim Shady, but X3 limp mode

A few days after celebrating my success that the car was sorted, the nonsense started again. Scanning the car revealed Cyl2 is complaining now. So from the initial diagnosis where I moved problematic coil to Cyl2, the problem appears to have moved as well. Clearing the codes is a temporary fix, because as soon as the motor get's properly hot, the misfires start immediately.

Also, it seems the battery is finally giving notice, as I had an incident where after a 40min drive, when I stopped and switched off, the car popped up a warning that battery is discharged and I should start the car immediately. I did some checking, and the battery is 7 years old now, so it's time I guess.

I've been in touch with ABM, just awaiting stock on the battery, then will go collect that, together with some new coil packs and spark plugs to change out just in case.

Further updates to come....
 
Top