The General's E92 335i

GoCart

///Member
Clever stuff, thanks for sharing.

Also good to know the Z4 is such a pleasure, I cannot tell myself a E89 is completely off the cards given my Z history :oops:
 
Clever stuff, thanks for sharing.

Also good to know the Z4 is such a pleasure, I cannot tell myself a E89 is completely off the cards given my Z history :oops:
Absolutely,
Im not going to lie, its common knowledge that the Z4 35i/is is the holy grail, its the perfectly rounded N54 vehicle.
The subtle inclusions in the software on the Z4 as opposed to any other really give it the edge, especially in Daily Driving.
let alone the performance aspect.
 
So small update in preparation for some upcoming maintenance.

I gave the gents at Auto Bav Midrand a call for some parts needed:
New Injector Seals
New Injector Decoupler Elements
New Water Pipe to Block Gasket
IMG-20210824-WA0017.jpeg

As a side note, from my previous tuning post, i have noticed an error since uploading the new map i created, in terms of DKG Idle Speed Target error, this is due to the Rear Axle Ratio from the 1M Base file not matching the Vehicle Speed correction tables i updated from the Z4 35is file (the 2 cars have different Diffs, so the ratios are slightly out, and i just need to amend the file to match the ratios up and all will be sorted, have already done it, just need to write th file to the car.)

Anyways, took an amateur photo of my Road Menace :D
20210824_071900.jpg

Will Update more once the Injectors have been leak tested and new seals fitted with Ye Old Nicholas (@osiris ) lol
 
Howdy guys.
So just a quickie update.
After purchasing the above seals and Decoupler elements, I arranged with @osiris and I met back at his place this evening after work as the banter and vibe is always good when working on the car.

Prepared the car
IMG_20210828_015817_387.jpg

Then got out the coils, Fuel Lines and Injector brackets
IMG_20210828_015817_503.jpg
Quick inspection of the bores and that all is clean and no issues
IMG-1531.jpg
Went ahead and removed the injectors with the Precision Raceworks Injector removal tool. And proceeded to fit the injectors opposite and outside outside engine for a leakage test.
IMG-1533.jpg
IMG-1534.jpg
IMG-1535.jpg
Happy to report after a couple tests and swings, none of the injectors leak which was a great sign.
@osiris even went as far to fit his old leaking Injector to Cyl.1 to make sure we doing it right and sire enough his old Injector leaked immediately.
So I'm a very happy guy.

Didn't get any pics of the seal fitment and reinstall. But it went flawlessly.

The car is still currently unassembled in the garage, but all injectors are in. Didn't want to finish and start car so late. So will finish in the morning and prime and start the car.
 

Attachments

  • IMG_20210828_015817_553.jpg
    IMG_20210828_015817_553.jpg
    199.7 KB · Views: 28
  • IMG_20210828_015817_578.jpg
    IMG_20210828_015817_578.jpg
    223.5 KB · Views: 27
Very nice, a happy result.

PS' those clean hands are a sign of a clean engine, am I right ;)(y)
Haha yea the hands got dirtier as we continued.
But thanks man yea very happy with the result and the fact that none of them are leaking and are in good shape.
Next week I've taken a long weekend so nick and I will start the Turbo job Friday morning.

Looking forward to it. I need new coils and plugs also.
 
Absolutely,
Im not going to lie, its common knowledge that the Z4 35i/is is the holy grail, its the perfectly rounded N54 vehicle.
The subtle inclusions in the software on the Z4 as opposed to any other really give it the edge, especially in Daily Driving.
let alone the performance aspect.
Hi Bud,

I have the PPK1 OEM BMW software on my E92 335i. BMW SA does not have an option to upgarde to 35is software. Where did you get the upgrade? I would need upgraded cooling and intercooler for this option?
 
Hi Bud,

I have the PPK1 OEM BMW software on my E92 335i. BMW SA does not have an option to upgarde to 35is software. Where did you get the upgrade? I would need upgraded cooling and intercooler for this option?
Hey man.
The PPK setup is a good kit. But yours is for IJE0S ROM version I believe.

The software upgrades I've done are not dealer options, and they will never update software like this onto a different car.

I did the change myself. And configured the software accordingly. Takes a bit of time and finesse, but it is possible.

I may be wrong, but the PPK should have the upgraded Cooling setup with an additional Radiator in the passenger side fender well, as well as an upgraded Fan with beefier cooling module, but at the same time. This may have been specific to the 335is from the USA. Can you confirm?

I'm running stock cooling with my software setup and I've had no issues man.
 

osiris

///Member
Howdy guys.
So just a quickie update.
After purchasing the above seals and Decoupler elements, I arranged with @osiris and I met back at his place this evening after work as the banter and vibe is always good when working on the car.

Prepared the car
View attachment 6923

Then got out the coils, Fuel Lines and Injector brackets
View attachment 6925
Quick inspection of the bores and that all is clean and no issues
View attachment 6928
Went ahead and removed the injectors with the Precision Raceworks Injector removal tool. And proceeded to fit the injectors opposite and outside outside engine for a leakage test.
View attachment 6931
View attachment 6930
View attachment 6929
Happy to report after a couple tests and swings, none of the injectors leak which was a great sign.
@osiris even went as far to fit his old leaking Injector to Cyl.1 to make sure we doing it right and sire enough his old Injector leaked immediately.
So I'm a very happy guy.

Didn't get any pics of the seal fitment and reinstall. But it went flawlessly.

The car is still currently unassembled in the garage, but all injectors are in. Didn't want to finish and start car so late. So will finish in the morning and prime and start the car.
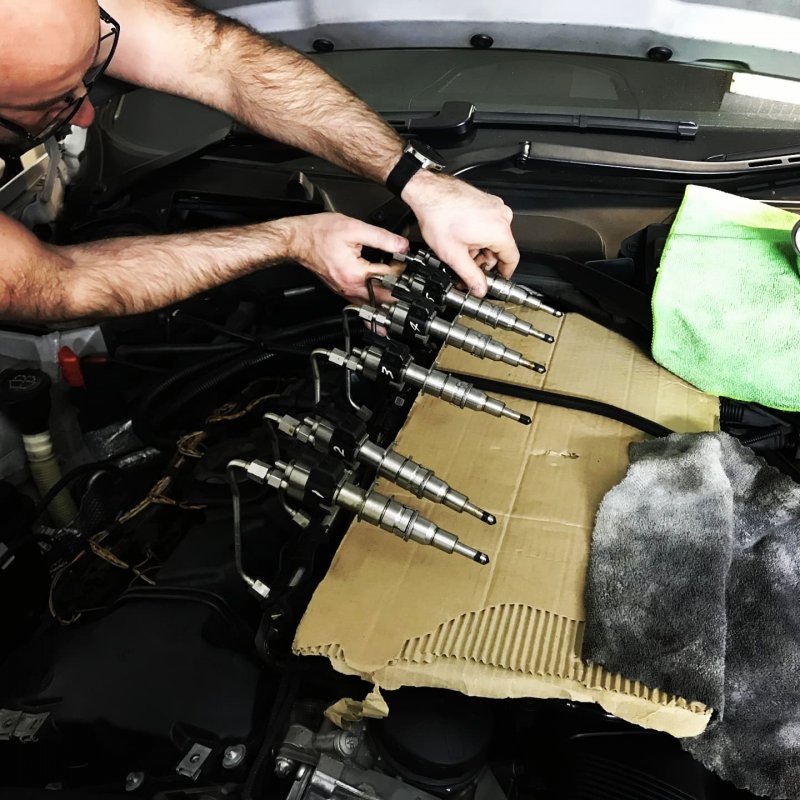
Nice, It was good to see that none of them were leaking as its been bothering you for a while that you might have had a leaky injector. At least we gave the tips a good proper clean as well.

Looking forward to the turbo replacement, well sort of lol, hopefully no issues with bolts or studs being over tightened by previous mechanics.
 
Hey man.
The PPK setup is a good kit. But yours is for IJE0S ROM version I believe.

The software upgrades I've done are not dealer options, and they will never update software like this onto a different car.

I did the change myself. And configured the software accordingly. Takes a bit of time and finesse, but it is possible.

I may be wrong, but the PPK should have the upgraded Cooling setup with an additional Radiator in the passenger side fender well, as well as an upgraded Fan with beefier cooling module, but at the same time. This may have been specific to the 335is from the USA. Can you confirm?

I'm running stock cooling with my software setup and I've had no issues man.
Hi,
The PPK1 kit on the E92 335i does not require hardware upgrades but the PPK2 kit does for the same power increase. The PPK2 kit is not available for the E92 335i in South Africa- the 335is kit in the US requires the hardware upgrade but again not available in SA
 
Hi,
The PPK1 kit on the E92 335i does not require hardware upgrades but the PPK2 kit does for the same power increase. The PPK2 kit is not available for the E92 335i in South Africa- the 335is kit in the US requires the hardware upgrade but again not available in SA
OK cool, ya, pity, you can buy the Hardware kit via ECS Tuning, but it is expensive.
All it is is the Coolant lines, and additional radiator.
 
Howzit, what downpipes do you have fitted? Want to fit the TMSS pipes but live in Cape Town. Need someone to take in their E92 335i, to use as a template, but so far no takers??
 
Howzit, what downpipes do you have fitted? Want to fit the TMSS pipes but live in Cape Town. Need someone to take in their E92 335i, to use as a template, but so far no takers??
Howsit man, I have stock Downpipes, and just had the cats knocked out, both @osiris run our Stock downpipes this way, no issues, and same benefits as aftermarket DP's.
using the 3inch aftermarket downpipes are nice, but they sit very close to the Engine mount, and end up cooking them over time. stock gutted downpipes are more than sufficient unless you aiming to extract every last bit of horsepower, which i doubt.

Just go to a local exhaust shop, and have them remove yours, knock out the insides and refit.
 

osiris

///Member
Howsit man, I have stock Downpipes, and just had the cats knocked out, both @osiris run our Stock downpipes this way, no issues, and same benefits as aftermarket DP's.
using the 3inch aftermarket downpipes are nice, but they sit very close to the Engine mount, and end up cooking them over time. stock gutted downpipes are more than sufficient unless you aiming to extract every last bit of horsepower, which i doubt.

Just go to a local exhaust shop, and have them remove yours, knock out the insides and refit.
yup, I ran aftermarket downpipes for ages. I did back to back dynos with the gutted downpipes vs aftermarket downpipes and there was no difference in power just cooked engine mounts and irritations when trying to remove O2 sensors etc.
 
Hi Everyone,
So finally the much awaited update ive been waiting to do.

This past weekend @osiris and I got to the arduous task of doing the Turbo swap on my E92. not without its challenges, i took leave on the Friday, so as to make sure that there was enough time to get through everything and not rush. And im glad i did, for reasons i will get into below.

Leading up to the Event, all items were prepared ahead of time making sure that nothing was missing or needed that we needed to make a plan for this included:
Mamba TD03-14T Turbos prepared by Gabby @ Fastec (The man is a legend)
New 2" Silicone Inlets from Danny
New Precision Raceworks aluminum Inlet Adaptors
All new OEM Oil Feed and Return lines
All new OEM Turbo Install Studs and Nuts
All new OEM Gaskets for Turbos, Downpipes and Mid Pipe
All new OEM Drive Belt and Pulleys (2 x Deflector Pulleys and the Tensioner)
All new OEM Coolant Tank
New Billet "Mickey Mouse" coolant adaptor for the front of the block.

In advance, i want to give huge shout to the following people, without who this weekend would have been a monumental F#%k Up:
@osiris
@Danny2
@deago.parts@abmbmw
@KingofThreads (I will Explain why soon)

I did not take as many photos as i wanted to, so some will be explained rather than shown.
Also the posts will be broken up due to the Image count limits for posts.
wait till the final post is up before making comments thanks all.

To get right into it, I got to Nicks house where he prepared the space where my car will live for the next few days
IMG-20210902-WA0024.jpg

We immediately got right into at around 9pm, with the car jacked up and front wheels removed
IMG_20210903_063709_738.jpg

Covers, Fan and Intercooler were then removed
20210902_221438.jpg
20210902_221500.jpg

This was when we spotted the first issue that ive been living with since i got the car back from the last time Afzil assisted with replacing the Stock turbos after i removed the China 16T turbos from the car.
Loose front turbo outlet. this was turning freely and easily. so natural boost leak location
IMG_1595.JPG

Nick and I then got to the big task of removing the Subframe and Steering rack, seeing as mine is Hydraulic and not the Electronic one like Nicks Z4, we couldnt just remove it, so we kept the Steering Rack and Subframe together, lowered it and swiveled it to the passenger side where it remained for the rest of the weekend.
20210903_101424.jpg
IMG_1613.JPG
Nick being Nick went ahead and gave the subframe a SOLID clean, well the parts he could reach.
IMG_1614.JPG

This now gave us our First view of the Turbos and Exhaust that are to be our next task.
IMG_20210905_073802_217.jpg
 
Once the Downpipes and MidPipe was removed (No pictures of this im afraid), I started on the Water Pump and Thermostat removal.
Here is some Timelapse clips of me getting sh!t done

Water Pump and Thermostat out
IMG_20210905_073802_272.jpg

Outlets were moved
And gave me a good look at the Oil Drains
Now to be brutally fair, this is the first time im replacing them, in the past ive opted to continue using the original ones, so these have been through now 5 Turbos replacements, and you can see the front turbo drain was kinked and the rear was in bad state, so it was about time i did sh!t correctly and finally get them replaced with new, as well as both drains leaking, as again, i cheaped out in the past and didnt replace the steel gasket, this i take the blame on myself. should have done that ages ago:
20210903_123112.jpg
20210903_123133.jpg

While i was getting on with the turbo removal, Nick tackled the infamous Pickey Mouse fitting, which, as expected, broke as soon as he tried to remove it (No Image of the new one fitted).
IMG_1597.JPG

i got the Turbos out, eventually and started cleaning the surface to prepare for the new turbos.
IMG_20210905_073802_300.jpg
As you can see the OEM Coolant lines are still there, i didnt replace these, and the i used the Original Washers (I forgot to purchase new replacement o-rings to my dismay. but they were replaced on the last turbo change, so they would be fine (Luckily)

As you can see, our cups for the Bolts, screws and other parts are racking up, so we dont have any spare parts left over on installation:
IMG_1604.JPG
IMG_20210905_074413_654.jpg

All covers and other parts sitting to the side
IMG_1600.JPG

New Parts waiting their turn to be installed and used:
IMG_1612.JPG

Old Turbos out:
IMG_1610.JPG
Now, these turbos when i had them last fitted, were Provided by Afzil, i knew they needed refurb, but i was also asked if i wanted to fit new Wastegate kit, which, to me trying to save costs, i declined, and just went ahead with the new cores.
These turbos have zero shaft play and no leaking seals, its only the Rattle that need to be addressed with a new Kit, so ill be selling these. ill arrange with Danny to see if i can sell them and include the Wastegate repair kit for a prospective buyer?
Will do a separate thread for this.
 
next up, the new 14T hybrid Turbos were prepared and setup with the new Oil Drains and Oil feeds, with the new gaskets.

IMG_1618.JPG
IMG_20210905_074413_714.jpg

New turbos are now in with all lines connected and prepared, this is where the first major snag came in (More info further down):
IMG_1621.JPG
Nice view from the Top
IMG-20210904-WA0013.jpeg

Also no picture, but we ran the rear inlet before doing the turbos.
Danny also arrived to Drop off some oil i ordered and also assisted me in fitting the new Drive Belt and Pulleys, as well as run the Front Inlet.
The only photo i have of this is the front inlet sitting pretty on the Precision Raceworks Inlet Adaptor
20210903_183235.jpg

As explained, we hit our first snag, The main Coolant pipe going into the block had 2 stripped bolt threads, and was pasted with gasket maker to ensure no leaks, so was essentially held together with 2 bolts and the Gasket Makers since the last Turbo job done.

So the decision was made to not do the same fix, but rather to the job properly how it should of been done, i called King of Threads, and early Saturday morning their Technician arrived, and i explained i wanted all 4 bolt holes HeliCoiled. this was done in about 30 minutes, the guy was precise, friendly and super efficient.
He arrived before i even had a chance to strip off the Coolant line, so while i did that he prepared his tools and compressor.
I prayed that i didnt have to remove the turbos again, so a quick inspection he said i just need to remove the Heat Shields behind the turbos, which i was gladly willing to do. then he started, covered all crevices with rags to ensure no filings and material went into any turbo or coolant passage:
20210904_091606.jpg
20210904_091440.jpg

With that out the way and correctly fixed, The Coolant supply line was refitted and all was well.
IMG_1622.JPG
 
Not really much left to do, and with no real additional photos taken, we pressed on and started fitting the rest of the parts back to the car.
this is where i started making stupid mistakes, this wsa due to me being tired as we went to bed around 2 or 3am every morning after a long day.

First mistake
I fitted the ENTIRE exhaust system back on the car, torqued up and tightened, only to realise i left off the Engine Mount bracket off the block, so, had to strip it all off agaqin to refit the Engine mount bracket, torqued that up, and then refit the Exhaust once agaain.
All O2 Sensors fitted correctly and inplace.
IMG_1611.JPG

Second Mistake:
After fitting everything in place, all that was left to do was fit the Coolant bottle and then fill fluids,
Only for me to realise, then when i fitted the Outlet pipe and intercooler, i wedge the Coolant bottle lower line between the Chassis frame and the Outlet, no way to get it out, so, strip the intercooler and piping again to get it out.
all in all, wasted about 3hrs of time with mistakes 1 and 2 :D but in the end got it done.

So with everything fitted we were almost there.
Time to fill coolant, and Oil, and get ready for the first start:
IMG_20210905_074413_800.jpg
Nick Filled Oil and Coolant,
Unplugged all Injectors, connected the Battery and primed the turbos.
Car fired up right away and we let it idle up to temp. and we spent the next 30 minutes monitoring for any leaks, which, thankfully due to our awesome tools of Torque wrenches, not a single leak was present.
Video of the first run in.

Ok, no to the last, and worst mistake i made, and in the purity of being as honest as possible, this was by far the STUPIDEST F%$K up ive ever made.
With the car put back together, sunday morning did a final inspection for leaks, and with none present, i fitted all under trays, engine covers and wheels.
we dropped the car down, checked for codes. and took the car for its first drive.
only got out the gate and a few hundred metres up the road before..... wouldnt you believe it, i forgot to tighten the Wheel studs. before the words were out of my mouth to stop the car, the inevitable happened:
IMG-20210905-WA0010.jpeg
Wheel came off, luckily Nick and I were only doing about 15kph, so the wheel stayed within the wheel well, and broke the fender, no other damage took place.
this could have been far worse, and am very thankful that we got off as light as we did.

We found all the wheel bolts that came off (none sheered thankfully)
And nick found the Lock Nut:
IMG-20210905-WA0012.jpeg

We had the car jacked up and put it all back together in about 20minutes.

and here is the aftermath of my stupidity:
IMG-20210905-WA0014.jpeg
I am now looking for a replacement Fender. if anyone has a silver one available, id be interested.
We gave the car a good drive after this being careful, and the car is running beautifully. so smooth and will be monitoring the car for next few days.

Again, id like to give a big shout out to @osiris , and @Danny2 who came out late one night to drop off off some clamps after Nicks incredible strength broke a clamp :D

Thanks to everyone for reading, will answer any questions if needed.
might add more detail if i remember something.

This was a monumental task, and i enjoyed every minute of it, Working with @osiris is always a pleasure and his OCD is always welcomed.
 
Top