Please note as we submit this review updated firmware has just been made available JB3 2.0 (version 03/16)...which now adds some serious race maps to the arsenal for those who do not want to bother with custom mapping)
Feedback - our project car:
The JB3 2.0 install was easy.
You will need a JB3 third generation board to plug in the interface cable and to download software and change maps. If you don’t have this you can also use your chip burner, to download the hex file, burn the chip and use the pedals to change maps...but this is not fun...get the full gear so you can see all the potential of the software and future mapping. We installed the interface cable through the dash board and when not in use it is neatly tucked away under the dash...see picture. Oh yes, at first it will be a pain to get the new interface to communicate with the JB3 due to Windows Vista not automatically recognising the old technology (com port vs usb cable) conversion. Having a BT tool is great for data-logging if you have enough hard drive space on a tiny laptop as in my case...but you can also datalog using the JB3 interface cable & laptop.
We decided to run map 3 and use as a (base map) and map 8 to compare with JB3 1.4. But also maps 4, 5, 6, 7 & 8 to see power delivery throughout the new beta maps. There was at least 30 minute breaks between the runs...and for the last run (map 8), we waited at least an hour since the car was so hot. Outside temp was around 20 degrees celsius with a 66% humidity by the evening.
The baseline (complete stock) readings were: 217Kw & 404Nm done a couple of months before on the same dyno.
Findings:
The boost targets for JB3 2.0 is the same as 1.4.
BUT, it is delivered very differently. It was astounding to see the boost kicks in with all its might from 3500rpms...straight up...from 0.2 to 0.9 bar sustaining it all the way to peak out at just before 7,000rpms...a very different boost delivery compared to 1.4 where boost just drops like a stone from 6,000rpms. The CMGS gauge read 15psi for map 6 & 7 and 15.5psi on map 8.
We compared some of the dyno runs with JB3 1.4 (which dyno runs were done on the same dyno machine on the 10 August 2009...but of course operating conditions, weather and temperatures were different)
JB3 2.0 and 1.4 is day and night in HOW power is delivered. I think BMS had the track and particularly the drag circuit in mind when these maps were developed.
Map 3
Pulled 280.7Kw @ 5525rpm & 554Nm @ 2954rpm with Boost: 0.81677 @ 4249rpm. This is a far cry from 1.4 which delivered a measily 245kw. Sure, I added meth with the JB3 2.0 dyno runs but the power differences are so stark that a comparison between the firmwares are actually useless.
Map 8
Speed:193km/h @ 6489rpm
321.3Kw @5827rpm
613Nm @2630rpm
Boost: 0.98538@6489rpm
On the road, the drive confirmed everything I saw on the boost graphs...the car is simply alive and damn quick off the mark...it just storms forward and goes and screams right up to the 7,000rpm tachometer...the DTC light does not stop blinking (poor thing).
Power mods were JB3 2.0; DPs; IC; DCI; race fuel and 100% meth.


JB3 and new cable:


Cable neatly installed:


Challenges:
Controlling boost leaks at these high frantic levels of boost is a huge challenge. If you run maps 3 -5 you will not have serious boost leak issues but anything above that; you will have to check a few things. See diagramme:
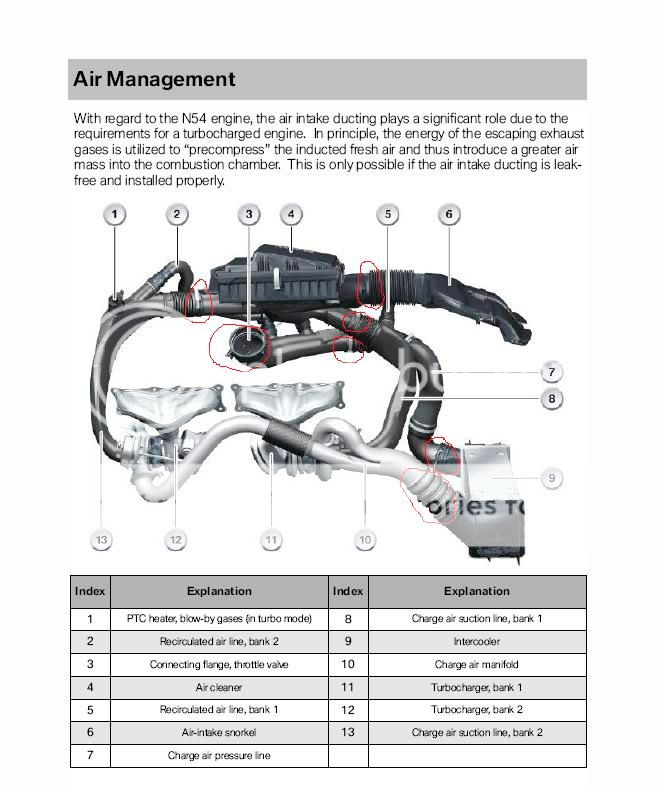
The red circles are the possible connections vulnerable to boost leaks. Also make sure to check the stock Diverter Valves and or your aftermarket performance Diverter Valve connections and the charge pipe on the side of the intercooler as well as the throttle body...oh ya and the exhaust if you have an aftermarket system.
Stock Diverter Valves:

Stock charge pipe. See red circles where boost leaks could appear:

Aftermarket Diverter Valves (Forge)

The boost problem on the project car was the flimsy plastic OEM connections used on the aftermarket intercooler, which kept on popping off on 15psi and above boost levels with peaks of 18psi....on the Dyno.

We replaced the stock connectors with silicone hoses (as above) and the boost leaks went away...we wish we had the problem fixed before the dyno runs because we were expecting the 350kw mark, which we were aiming for. We knew the Tq figures were going to be over 613Nm but we were hoping for a healthier KW output with the bolted mods. Well there is always a next time.
The new magic Map is 1 (one) this map allows the user to alter map settings based on a number of variables: Altitude; extreme heat or extreme cold temps and of course to tweak Kw & Nm and fuel ratios for specific drag racing purposes...(on the track). There are a few tested (One maps) available for high altitude users to get them started off but they can further tweak these after having done some data-logging to see how the car performs and where to fine tune. We have a custom map for the project car but we have not had it on the dyno, nor done much road experimentation...but essentially boost was increased to 18psi (on this special map 1) instead of the normal max of 15.5psi and the map (one) compliments the use of meth and NOS which we hope is around the corner.
Feedback - our project car:
The JB3 2.0 install was easy.
You will need a JB3 third generation board to plug in the interface cable and to download software and change maps. If you don’t have this you can also use your chip burner, to download the hex file, burn the chip and use the pedals to change maps...but this is not fun...get the full gear so you can see all the potential of the software and future mapping. We installed the interface cable through the dash board and when not in use it is neatly tucked away under the dash...see picture. Oh yes, at first it will be a pain to get the new interface to communicate with the JB3 due to Windows Vista not automatically recognising the old technology (com port vs usb cable) conversion. Having a BT tool is great for data-logging if you have enough hard drive space on a tiny laptop as in my case...but you can also datalog using the JB3 interface cable & laptop.
We decided to run map 3 and use as a (base map) and map 8 to compare with JB3 1.4. But also maps 4, 5, 6, 7 & 8 to see power delivery throughout the new beta maps. There was at least 30 minute breaks between the runs...and for the last run (map 8), we waited at least an hour since the car was so hot. Outside temp was around 20 degrees celsius with a 66% humidity by the evening.
The baseline (complete stock) readings were: 217Kw & 404Nm done a couple of months before on the same dyno.
Findings:
The boost targets for JB3 2.0 is the same as 1.4.
BUT, it is delivered very differently. It was astounding to see the boost kicks in with all its might from 3500rpms...straight up...from 0.2 to 0.9 bar sustaining it all the way to peak out at just before 7,000rpms...a very different boost delivery compared to 1.4 where boost just drops like a stone from 6,000rpms. The CMGS gauge read 15psi for map 6 & 7 and 15.5psi on map 8.
We compared some of the dyno runs with JB3 1.4 (which dyno runs were done on the same dyno machine on the 10 August 2009...but of course operating conditions, weather and temperatures were different)
JB3 2.0 and 1.4 is day and night in HOW power is delivered. I think BMS had the track and particularly the drag circuit in mind when these maps were developed.
Map 3
Pulled 280.7Kw @ 5525rpm & 554Nm @ 2954rpm with Boost: 0.81677 @ 4249rpm. This is a far cry from 1.4 which delivered a measily 245kw. Sure, I added meth with the JB3 2.0 dyno runs but the power differences are so stark that a comparison between the firmwares are actually useless.
Map 8
Speed:193km/h @ 6489rpm
321.3Kw @5827rpm
613Nm @2630rpm
Boost: 0.98538@6489rpm
On the road, the drive confirmed everything I saw on the boost graphs...the car is simply alive and damn quick off the mark...it just storms forward and goes and screams right up to the 7,000rpm tachometer...the DTC light does not stop blinking (poor thing).
Power mods were JB3 2.0; DPs; IC; DCI; race fuel and 100% meth.
JB3 and new cable:
Cable neatly installed:
Challenges:
Controlling boost leaks at these high frantic levels of boost is a huge challenge. If you run maps 3 -5 you will not have serious boost leak issues but anything above that; you will have to check a few things. See diagramme:
The red circles are the possible connections vulnerable to boost leaks. Also make sure to check the stock Diverter Valves and or your aftermarket performance Diverter Valve connections and the charge pipe on the side of the intercooler as well as the throttle body...oh ya and the exhaust if you have an aftermarket system.
Stock Diverter Valves:
Stock charge pipe. See red circles where boost leaks could appear:
Aftermarket Diverter Valves (Forge)
The boost problem on the project car was the flimsy plastic OEM connections used on the aftermarket intercooler, which kept on popping off on 15psi and above boost levels with peaks of 18psi....on the Dyno.
We replaced the stock connectors with silicone hoses (as above) and the boost leaks went away...we wish we had the problem fixed before the dyno runs because we were expecting the 350kw mark, which we were aiming for. We knew the Tq figures were going to be over 613Nm but we were hoping for a healthier KW output with the bolted mods. Well there is always a next time.
The new magic Map is 1 (one) this map allows the user to alter map settings based on a number of variables: Altitude; extreme heat or extreme cold temps and of course to tweak Kw & Nm and fuel ratios for specific drag racing purposes...(on the track). There are a few tested (One maps) available for high altitude users to get them started off but they can further tweak these after having done some data-logging to see how the car performs and where to fine tune. We have a custom map for the project car but we have not had it on the dyno, nor done much road experimentation...but essentially boost was increased to 18psi (on this special map 1) instead of the normal max of 15.5psi and the map (one) compliments the use of meth and NOS which we hope is around the corner.
 imp:
imp: